Custom Search
Showing posts with label Tutorials. Show all posts

Wednesday, October 15, 2008

A Very Pleasant Morning to Me

I was checking on this blog’s traffic early this morning and saw a referring website which I have not seen before, and there was a huge volume of visitors coming from it. So, just like what I do each time that happens, I clicked on the link to see what that referring website is and why I was getting so much traffic from it (I’m using the word “much” here in relation and comparison to what I usually get… see my “Raising the White Flag” post if you want to learn more about that).

And this is what I saw…


Woohoo!

To Jacob Gube and Smashing Magazine, thank you so much for including my tutorial in your list!

If you’re curious about the tutorial, just click on this.

Saturday, December 8, 2007

A Photoshop Tutorial (Part 1 - Starting with the Very Basic)

This is the first of what I’m planning to be a long series of “tutorials” on the most basic things about Photoshop. I’m intending this series to help anyone and everyone out there who wants to learn how to use Photoshop but does not know where to start.

Whenever I’m asked by someone to teach him/her how to use Photoshop, the first thing I ask them is what it is specifically that they want to do in Photoshop.

Well, aside from the obvious of being a graphics editing software/program, Photoshop has tons of capabilities, and I do mean TONS! You can resize images with it, crop images with it, modify/edit images with it, create art with it, the list just goes on and on. And along with that much capability, there are also TONS of things to learn about it.

Learning how to use Photoshop is pretty easy, even on your own, as it is (in my opinion) very user-friendly and, to a great extent, very straight forward. But as I have already mentioned, there are so many things to learn about it that even I, who have been using it for more than 8 years now, still have a lot left to learn (and, again, I do mean A LOT). You will see proofs of this as we go along.

So, ladies and gents, here we go.

Wait, I almost forgot to mention something. The Photoshop screen/interface, or “workspace” as it is properly called, is highly customizable. What this means is that you can “set” the Photoshop workspace in such a way that it will let you work more comfortably and efficiently. Almost everything you see on the Photoshop workspace can be hidden, displayed, and arranged depending on your preferences and/or needs.

Photoshop may have a lot of tools, but there will certainly be a whole bunch of it that you won’t need for any specific type of job. So, it's common practice to a lot of (if not all) Photoshop users to "hide" the things that are not needed so as not to clutter up the screen too much.

Now, why am I telling you this? I’m just thinking that if you’ll be using Photoshop that’s installed on someone else’s computer, don’t panic if what you see on your screen does not match the screen shots in my tutorials. Rest assured, I will try my best to give instructions every step of the way, including how to make things appear and/or disappear.

Another thing, whatever Photoshop version you will be using should not be much of an issue as they are pretty much similar. It’s just that newer versions have more features than older ones. And since I’m going to talk only about the basics, I probably won’t be dealing with them, at least not just yet.

Now, we start.

Upon Starting/Launching/Running Photoshop

For those using Windows-based machines, the big gray area that you will see when you run Photoshop IS NOT the “canvas”. (By the way, depending on your desktop theme, the area I’m talking about may not be gray, it may be some other color. Take a look at the following screenshot and see what space/area I am talking about).
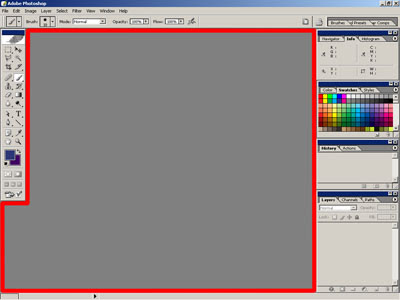
The area/space inside the red outline is the “big gray area” I’m referring to.
So, what is a “canvas”? The canvas, as Photoshop calls it, is the “document” or space where you do all the work. A canvas may either be a blank white or any other colored space, it can also be an image/photo. Actually, when you open an image file in Photoshop, that becomes a canvas, or should I say, that IS a canvas.

So, what does it mean if the big gray space is not a canvas? Well, no matter what tool on the toolbar you click on, clicking and dragging it anywhere on the gray space will do nothing.


I don’t find the need to stress this to Mac users because instead of a big gray space, you’ll see your desktop wallpaper instead. Obviously, that means you’ve got nothing to work with.

What you should do upon launching/running Photoshop is to either open an image file or make yourself a canvas.

Opening an Image File

Opening an image file in Photoshop is very much like opening a file in any other program. Click on ‘File’ and then click on ‘Open’.


In the ‘Open’ window/dialog box that appears, find the file that you want opened, click on it, and click on the ‘Open’ button. Now you have a “canvas” to work with/on.


By the way, Photoshop can open a wide range of image file formats as well as a couple of “non-image” file formats. To see all the file formats that Photoshop recognizes/supports, click on the button at the end of the dropdown menu field labeled “Files of type”. For starters, I would advice you to stick with the JPEG (or .jpg) file format for now, unless you already know something about the other image file formats.

A word of caution for those who are about to take or have taken this route. Read this VERY CAREFULLY and UNTERSTAND IT WELL. For those who opened an image file, BE VERY CAREFUL IN SAVING YOUR WORK! If you’ve just put a mustache on someone’s face or whatever it is that you will be doing or have already done, once you save your work and close that image, YOU WILL NEVER EVER BE ABLE TO RESTORE IT BACK TO ITS ORIGINAL STATE! So what I advise you to do is save your work with a different filename. JUST DON’T OVERWRITE THE ORIGINAL.

Creating a Canvas

To “create” a blank canvas, click on ‘File’ then ‘New’. A window will appear where you can specify your canvas’s dimensions, resolution, color mode, and background color.


For starters, just set the resolution at 72 pixels per inch. If it’s not set at 72 pixels per inch, click on the text field beside ‘Resolution’, delete the existing value, and key in “72”). If you don’t know anything about resolution and want to know what it is and what it is about, I have a little tutorial on it here.


For the height and width, I’ll leave them up to you. Just don’t make it so darn big or ridiculously small. By the way, Photoshop allows you to choose from several units of measurement with which to define your canvas’ dimensions (pixels, inches, centimeters, millimeters, points, picas, and columns). To select a unit of measurement, simply click on the button at the end of the dropdown menu field labeled “Height” (or “Width”) and click on the unit of measurement of your choice. (Note: Changing the unit of measurement of the height will also change the unit of measurement of the width and vice-versa)


If you’re not very good with measurements, you may want to just choose from the preset canvas sizes provided. To do so, simply click on the button at the end of the dropdown menu field labeled “Preset” and click on the canvas size of your choice.


We’ll leave the background color set to “White” for now. If it’s not set to “white”, click on the button at the end of the dropdown menu field labeled “Background Contents” and click on ‘White’.


As for the ‘Color Mode’, just make sure it’s set to ‘RGB’ and ‘8 bit’. If it’s not set to ‘RGB’ and ‘8 bit’, I suppose you already know what to do.


Just ignore anything else that you might see on the “New” window/dialog box.

Now, click on the ‘Ok’ button and Voila! You now have your very own blank canvas.

Saving Your Work

Just like in any other programs, saving your work in Photoshop is very easy. Simply click on ‘File’ and then ‘Save’. That’s it... well, not really. Since Photoshop supports a big bunch of file formats, it provides you with as much formats with which to save your work. Choosing the file format with which to save your work depends on a wide variety of factors which includes number of colors, image quality, presence of additional/custom channels, and presence of “layers”, among others. But talking about this will provide enough material for another article. I’ll probably make a discussion on this next.

Anyway, (again, unless you already know something about the different file formats) to make sure that you’ll be saving your work with everything that you will be doing or have done (consciously or otherwise) intact, it would be best that you just go with whatever format Photoshop recommends you to save your file in.


If you are clueless about this, it would be best for you to just leave the “Format” as it is (the format you see on this screenshot may not be the same as what you might see on your screen, it’s ok, don’t panic).

Depending on what you have in your work (please refer to above mentioned factors), if you choose a format which is not compatible with your work, you may see messages warning you about stuff.

Experiment!

Now that you already know how to “produce” a canvas and save your work, I’ll leave you on your own for now. Just play around with the various tools that you see on screen. DO NOT BE AFRAID. Photoshop won’t bite you.

Wednesday, December 5, 2007

Resizing Affects Image Quality

Resizing bitmap or pixel-based images, whether it be scaling up (enlarging/blowing-up) or down (reducing/shrinking), will always affect image quality. Though, degradation of image quality is more evident/obvious when images are scaled-up than when they are scaled down.

Personally, I am not all that sensitive to the degradation in image quality when scaling images down. To tell you frankly, I really don’t notice any degradation of image quality when scaling down images. But there are numerous tutorials on the web that “teaches” you “how to scale down image sizes without losing image quality”. Honestly, I haven’t bothered reading any of them as I don’t feel the issue is all that important to me. And, in that case, I am in no position to tell any of you if those tutorials are any good.

However, despite my “disbelief” in the degradation of image quality resulting from scaling down images, I think I can “explain” what contributes to the “loss” in image quality that supposedly occurs when scaling down images based on my experience and my own personal understanding of how pixels and digital images work.

It’s quite simple, actually. When you scale down an image, the number of pixels that makes up that image is also reduced, and that means some pixels are eliminated/discarded from the image. If the number of pixels is reduced, the number of colors is also reduced. Therefore, the degradation in image quality.

As I’ve already mentioned, the degradation in image quality is a whole lot more severe when scaling up images. For that, I can give you a very simple explanation by means of an allegory.

Let’s say you have a piece of paper, any size of paper. Think of how you can enlarge the physical dimensions of that piece of paper. Obviously, you can’t, at least not without tearing the paper into pieces, laying the pieces down, and arranging them with gaps between them. This is quite similar to what happens when you scale up images. But instead of having gaps, the graphics software you use will put in additional pixels.

I cannot tell you how graphics software decide on the color of the additional pixels, but I’m inclined to believe that it’s probably some sort of an “averaging” kind of thing.

Say, for example, you have two differently colored pixels sitting side by side each other. The software you use (whatever it may be) probably “calculates” for the “average” of the two colors and assigns that color to a new pixel which it places between the two original pixels. You would now have three pixels. So, technically, you have “scaled up” the two pixels into three pixels. From a distance or at a certain magnification percentage, the overall appearance of the three pixels will appear quite similar to that of the two pixels. (This is just a personal hunch. By no means am I claiming that this is indeed what happens, so, you can probably just forget about ever reading this paragraph).

Anyway, to put things simply, you cannot expect your computer or whatever software you are using to produce or modify data where and when there is none.

Take this for instance. If you have a little photo of, let’s say a person. The person’s eyes in the photo are composed of only a few pixels, so few that you cannot make out the individual strands of his/her eyelashes. You should not and cannot expect your computer/software to be able to make those lashes appear when you scale up the image! They just can’t do it, period. (Well, probably, at least not in this day and age. Perhaps, just perhaps, someday when someone develops something like “nanopixels”, that might just become a possibility).

I hope this was helpful to some of you. ‘Til next time.

Friday, November 30, 2007

A Bit of Public Service

I’m having some doubts right now if the information that I’m about to share here will be of any use to anyone, now that almost every single person I know knows how to use Photoshop to some extent. But since this is my very first attempt at something like this, and because I still remember the time when I was ignorant about this, I've decided to start with something very basic.

But before I go on, I would like to make it very clear to all of you that I am no expert. I never had any formal training with regards to using any of the software that I use and I was never formally schooled in any IT course. The things that I know are either self taught or are acquired through research. So, to those who know better, please feel free to correct me whenever needed.
With that out of the way, welcome to my Introduction to Image Resolution lesson.

What is Image Resolution?

Basically, resolution pertains to the number of pixels that make up an image. The higher an image’s resolution is, the finer the image will appear on the monitor and in print.

Resolution is usually measured in terms of pixels-per-inch. That means we are talking about the number of pixels that fit in a given length of image (in this case, an inch). I’ll expound on this later as I think there’s something else I need to define before I proceed.

As I am writing this with the layperson in mind, I think I need to explain what a pixel is. The word “pixel”, by the way, is a result of the contraction of the words “picture element” (PICture Element = pixel). Simply put, a pixel is a “dot” of color. Pixels are usually square-shaped, but there are numerous applications which utilize non-square pixels such as those that deal with digital videos as well as some digital cameras. Personally, I have not yet encountered or seen a pixel shape other than a square. To avoid any confusion, beside the fact that I don’t know much about non-square pixels, we will just be talking about square pixels in this one.

Anyway, a digital image is formed in very much the same way as an image is formed in cross-stitching and in mosaic art forms. Actually, a digital image is just that, a mosaic of many different colored pixels. It’s just that in digital imagery you don’t need or have to paint the pixels in one by one (unless you want to), that task is done for you by the computer or, in the case of digital photography, the digital camera.

Let’s go back to the “pixels-per-inch” part. Since we are talking about square pixels, an inch of one-pixel-thick horizontal line should have the same number of pixels in it as an inch of one-pixel-thick vertical line considering that they have the same resolution. So, it doesn’t really matter whether your perceived direction of measurement is vertical or horizontal, so long as it’s not diagonal (like what we do when measuring a television or monitor’s screen size). I probably have already lost some of you there. Cue, visual aids.


The above illustration (not to scale) shows a 9 pixel-per-inch horizontal line (a) and a 9 pixel-per-inch vertical line (b). Go ahead, count the squares that you see. It also clarifies what I meant by a “one-pixel-thick line”.

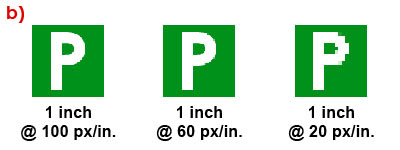
So, why “pixels-per-inch”? Why not say the image is this much pixels tall and that much pixels wide? Well, if you do the latter, you’re actually stating the dimensions of an image and not the resolution. Always remember that resolution and dimension is not in any way the same. They are not even similar to say the least. Take a look at the following examples:


In group (a) the numbers of pixels are used as a unit of measurement for the images’ sizes (all of them have a 72 pixels-per-inch resolution).

On the other hand, all the images in group (b) are of the same size (1 inch) but have varying resolutions. From this, you can also see proof of what I mentioned earlier. The higher an image’s resolution is, the finer the image appears.

So, how big is a pixel? Well, from the above illustrations, it is probably safe to say that pixel size varies depending on an image’s resolution. If you have an image that has a resolution of 1 pixel-per-inch, your pixels will be 1 inch tall and wide. On the other hand, if you have an image with a resolution of 100 pixels-per-inch, your pixels will be 1/100 inches or 0.01 inch tall and wide.

But then again, computers operate on a default setting (if you can call it that) in displaying digital images which prioritizes pixels over any other forms of measurement. What I meant by that is computers display pixels at a predefined size which is dictated by the size of the monitor and/or the display resolution setting (therefore, the graphics card also has a hand in this).

Allow me to clarify further. If you have two monitors, let’s say one is 15” and the other 18”, and both are operating at the 800 x 600 display resolution setting, the pixels displayed in the 18” monitor will be slightly bigger than the pixels displayed on the 15” one. On the other hand, a monitor will display larger pixels in the 800 x 600 display resolution setting and smaller pixels in the 1024 x 768 display resolution setting.

What does this all mean? Well, if you have an image that’s 1 inch wide and has a resolution of 10 pixels-per-inch, it will very likely appear on your computer’s monitor significantly smaller than an inch wide. On the other hand, if you have an image that’s 1 inch wide and has a resolution of 300 pixels-per-inch, it will appear on your monitor significantly larger than an inch wide (unless, of course, if the software you use to view your image does not have the ability to automatically change viewing sizes).

Just so that you know, most computer graphics cards and monitors operate at a resolution of 72 pixels-per-inch (I’ve seen some operating at 90+ pixels-per-inch). So, unless your image has a resolution of 72 pixels-per-inch, your image will most certainly appear either smaller or larger than its actual dimensions. In addition to that, as what I’ve mentioned regarding pixel sizes varying between different-sized monitors and different display resolution settings, an image with 72 pixels-per-inch displayed at 100% magnification will almost definitely not get displayed in its actual dimensions.

Anyway…

So, what’s the best resolution to use? It all depends on where you intend to use your digital image. If you are going to use your digital images on your website, 72 pixels-per-inch is right on the spot. But if you intend to print your digital image (through any method), I suggest you don’t go below 300 pixels-per-inch.

I use 600 pixels-per-inch for all my book cover designs, but for other things, 300 pixels-per-inch is usually enough for me. I’ve never used anything below 72 pixels-per-inch and I don’t see any point in doing so.

By the way, there’s something very important I need to mention regarding this. Working with high-resolution graphics will eat up a lot of your computer’s resources. So, first make sure that your computer can handle it.

Just to give you an idea, a computer running on Windows XP with a three-year old processor and a 512 MB RAM with tons of free hard disk space may just barely be able to handle a 8” x 10” image at 600 pixels-per-inch without crashing, though a slow down is most definitely expected.

Before I end this, I would just like to say one more thing, if you want to learn some tricks in Photoshop, the web is flooded with tutorials. Just Google something like “Photoshop text effects”, “Photoshop tutorials”, or “Photoshop tips and tricks”. BUT, bear in mind, most of the tutorials on the web, particularly those that involve layer styles and filters, only work in 72-pixels-per-inch. Though, with some Mathematics and tweaking, some of them can be made to work in higher resolutions.

That’s it for now. Class dismissed.
 

blogger templates | Make Money Online