Custom Search

Friday, August 29, 2008

Quote of the Day (Duh...)

“The Internet is a great way to get on the net.”
~ Bob Dole
Republican presidential candidate
Nature's Gift virgin coconut oil
Say what?

Thursday, August 28, 2008

Do You Walk or Do You Run? (Which One Will Get You Wetter Through the Rain)

image from http://www.flickr.com/photos/kamshots/622141879/I was finally able to work and finish(?) on a self imposed problem! However, the results I got were pretty disappointing as they did not jive with my earlier assumptions/predictions.

As I have mentioned in an earlier post, I was challenged by a Mythbusters episode to do my own experiments to determine whether a person would get wetter if he/she runs through the rain as compared to if he/she walks (actually, they worked on this twice and ended up with different results. So, I was left unconvinced). Yeah, you can say it, I’m nuts… somebody has already told me that. But then again, my “experiments” were paper-based and did not involve anybody walking and running through the rain as you may have been thinking previously.

So with all the knowledge I have in math (limited as it may be), this is what I got…

(By the way, before I proceed, I'd like to make a few things clear... I'm not an expert, I'm just playing around with the idea using whatever resources that are available to me and I am not saying/declaring in anyway that this is definitive. If you think this is all wrong, please feel free to discuss it with me, hopefully, in a pleasant manner so that you will not be afraid to identify yourself... look at the comments and see what I mean).

Given (all conversions have been rounded off):

  • Raindrop terminal velocity = 10 mph (14.67 ft/s)
  • Average walking speed of human beings = 3 mph (4.4 ft/s)
  • Average running speed of human beings = 10 mph (14.67 ft/s)
  • Light rain = 0.25 inches per hour (or 0.0000694 inches/second)
Estimates:
  • Surface area of the front of a person’s body (fa) = 1728 sq.in.
  • Surface area of the top of a person’s head and shoulders (ta) = 216 sq.in.
Derived Values:

Amount of water hitting the front of a person’s body:

  • Running = (fa x 0.0000694 in./s) = 0.1199232 cu.in./s
  • Walking = [(fa x 0.0000694 in./s) x 0.3] = 0.03597696 cu.in./s*

*The 0.3 multiplier is derived from dividing the average walking speed by the average running speed. The reason behind this derivation is that the terminal velocity of raindrops is equal to the average person’s running speed and, as such, I am assuming that a runner will get hit by water on the front of his body as much as he will on his head and shoulders. And, understandably, a walker will get hit by water on his front much less than the runner would. And the most logical thing to do I can think of is this… the 0.3 thingie.

Amount of water hitting a person’s head and shoulders (and any other body parts that may be seen/exposed from the top):

  • (ta x 0.0000694) = 0.015 cu.in./s
Computation:

Formula:

  • Walking = (0.03597696 cu.in./s + 0.015 cu.in./s)t
  • Running = (0.1199232 cu.in./s + 0.015 cu.in./s)t
Where: t = the amount of time it will take for the person to travel a given distance

Cases and Results:

@ 10 feet

Walking:
(0.03597696 cu.in./s + 0.015 cu.in./s)2.27 seconds = 0.115718 cu.in.

Running:
(0.1199232 cu.in./s + 0.015 cu.in./s)0.68 seconds = 0.091748 cu.in.

@ 20 feet

Walking:
(0.03597696 cu.in./s + 0.015 cu.in./s)4.54 seconds = 0.231435398 cu.in.

Running:
(0.1199232 cu.in./s + 0.015 cu.in./s)1.36 seconds = 0.183495552 cu.in.
@ 40 feet

Walking:
(0.03597696 cu.in./s + 0.015 cu.in./s)9.09 seconds = 0.463380566 cu.in.

Running:
(0.1199232 cu.in./s + 0.015 cu.in./s)2.73 seconds = 0.368340336 cu.in.

@ 80 feet

Walking:
(0.03597696 cu.in./s + 0.015 cu.in./s)18.18 seconds = 0.926761133 cu.in.

Running:
(0.1199232 cu.in./s + 0.015 cu.in./s)5.45 seconds = 0.73533144 cu.in.

@ 160 feet

Walking:
(0.03597696 cu.in./s + 0.015 cu.in./s)36.36 seconds = 1.853522266 cu.in.

Running:
(0.1199232 cu.in./s + 0.015 cu.in./s)10.91 seconds = 1.472012112 cu.in.

@ 320 feet

Walking:
(0.03597696 cu.in./s + 0.015 cu.in./s)72.72 seconds = 3.707044531 cu.in.

Running:
(0.1199232 cu.in./s + 0.015 cu.in./s)21.81 seconds = 2.942674992 cu.in.

@ 640 feet

Walking:
(0.03597696 cu.in./s + 0.015 cu.in./s)145.45 seconds = 7.414598832 cu.in.

Running:
(0.1199232 cu.in./s + 0.015 cu.in./s)43.63 seconds = 5.751776016 cu.in.

@ 1280 feet

Walking:
(0.03597696 cu.in./s + 0.015 cu.in./s)290.9 seconds = 14.82919766 cu.in.

Running:
(0.1199232 cu.in./s + 0.015 cu.in./s)87.25 seconds = 11.7720492 cu.in.

There…

So, why was I disappointed? Well, prior to doing this, my assumption was that in traveling short distances a person will reach his/her destination less wet if he/she ran through the rain as compared to if he/she walked, but as the distance increases he/she will end up less wet if he/she walked. And this is not what my results are telling me…

I even tried to compute for another value using Maurice Greene’s record sprinting speed of 26.7 mph (or 39.17 ft/s). But the results came out just the same considering that I used a multiplier of 2.67 for the amount of water hitting the front of his body at that speed. This proved even further that the faster you go through the rain the less wet you’ll get! Here’s what I got using Maurice Greene’s speed:

@ 10 ft = 0.087150685 cu.in.
@ 20 ft = 0.170949421 cu.in.
@ 40 ft = 0.341898843 cu.in.
@ 80 ft = 0.683797686 cu.in.
@ 160 ft = 1.367595372 cu.in.
@ 320 ft = 2.738542692 cu.in.
@ 640 ft = 5.477085385 cu.in.
@ 1280 ft = 10.95417077 cu.in.

From my results, I am now convinced that RUNNING THROUGH THE RAIN WILL ALWAYS MAKE YOU END UP LESS WET AS OPPOSED TO WALKING!

Quote of the Day (Rated R18)... naaah...

“Fill your paper with the breathings of your heart.”

~William Wordsworth

Angry notice, bawal umihe dito gago

Been seeing this sign for I can’t remember how long, finally decided to take a picture of it this morning.

And while I was hunting for the right quote to go with it on this here blog, I saw one that had me laughing… don’t ask me, I just find it funny for no apparent reason and I couldn’t resist including it here…
“If writers wrote as carelessly as some people talk, then adhasdh asdglaseuyt[bn[ pasdlgkhasdfasdf.”

~Lemony Snicket (Real name: Daniel Handler,
of the "A Series of Unfortunate Events" fame)

Wednesday, August 27, 2008

Busting Moon Landing Myths/Hoax Claims (The Mythbusters Way)


Just read this on Yahoo News today… “TV's 'Mythbusters' Tackle Moon Landing Hoax Claims”…

This I got to see!!!

I’ve been a big fan of the Mythbusters since the first time I saw it on TV.

I only get to watch about three hours’ worth of TV every week nowadays, and a third of it is spent on watching Jamie, Adam, Tory, Grant, sexy (and pretty) brainiac Kari, and “Buster” bust myths. Going beyond my usual three hours of TV watching would only mean that I had been watching reruns of the show.

Mythbusters, for me, is Total Entertainment! It’s the best (if not the only) educational comedy show there is! I can’t think of an episode that didn’t make me laugh or snicker at some point.

Some of my favorites include:

“Who gets wetter?” – Do you get less wet if you run in the rain as compared to walking in the rain? I was not (and still am not) convinced of the results they got for this one. The reason why I liked this a lot is because it has challenged me to make my own “experiments” on this issue. I’m still working on it though…

Cell Phone Destruction – Lesson learned, Cell Phones DO NOT and CANNOT cause fire or explosions in gas stations! Side note: Adam lost his arm hair, some hair from his head, and one of his eyebrows working on this one!

Episode 9: Chicken Gun, Octopus Egg Pregnancy, Killer Washing Machine – One of the episodes that had me laughing until my stomach ached.

Trombone Explosion – Another hilarious one.

Jet Taxi – Simply AWESOME!!! Driving your car past across the rear end of a plane that’s taking off can send your car flying! This has happened several times in Brazil, believe it or not.

Archimedes Death Ray – VERY INTERESTING! Nuff said.

Elevator of death – I had been pondering on this for quite some time until the Mythbusters crew gave me the answer. I was wondering if I were in an elevator and the elevator would suddenly go into a free fall, will I be able to save my life if I were to jump up moments before the elevator hits the ground? Short and quick answer… NO!

Cooling a Six-Pack – Never thought you can cool a can (or several cans) of beer (or any beverage for that matter, I guess) in less than 5 minutes!

Breaking Glass – yes, it is possible, and it has been caught on tape… a person breaking a glass with his voice!

Shredded Plane – Lesson learned: it’s possible to shred an airplane with the propeller of another plane.

Exploding Pants – Very funny!

Mentos and Soda – Lesson learned, do not put Mentos and soda in your mouth at the same time. I’m still looking for somebody to play this joke on.

Earthquake Machine – Very very interesting!

I’ve got a whole lot more favorites, but I can’t see the significance in mentioning every one of them here. Though, I’d like to mention a couple more which I think are among the most interesting experiments they’ve done so far…

Elephants are indeed scared of mice, and
Putting in tons of explosives inside the revolving barrel of a cement mixer (truck) can vaporize the truck.

Now, the lunar landing. Yes, I’ve read about the hoax claims… and I want to see how they will prove or disprove them.

The Yahoo News article says “The Mythbusters 'NASA Moon Landing Hoax' episode debuts August 27 at 9:00 p.m. ET/PT on the Discovery Channel.” I’ve got to find out when it’s gonna be aired here… I just gotta!

Haven’t seen the Mythbusters? Try watching it once… you may just get hooked on it. It airs at 10:00 pm every Thursday here on the Discovery Channel (don’t know about reruns though).

---Oh my God! They killed Buster! You bastard!---

Don’t Bite the Hand that Feeds You

One thing I NEVER do is to be rude or bossy whenever I’m in a restaurant.

Putting the saying “don’t bite the hand that feeds you” (cliché as it may be) into practice may do you a lot more good than to go “power tripping” and satisfy your egotistic demands.

How and why you ask? Let me cite an example, I heard this story from a former employee of a popular food chain…

In one of his shifts in manning the kitchen, a close friend of his (let’s call him Paul) was manning the sushi bar with another guy in which it was common practice for them (at that time) to go about their work bare handed.

A guy in long sleeves and tie, upon getting seated at the bar, suddenly blurted out at Paul and his crew mate asking “Naghugas ba kayo ng mga kamay niyo?!” (Did you wash your hands?!) Paul smiled at the guy and politely said that he did. Then, the guy blurted out again “Dapat nakagloves kayo!” (You should wear gloves!) and turned to his companion and mumbled some things about Paul and his crew mate.

Paul (who, by that time, was already fed up) smiled at the guy, left his post, and went into the kitchen.

As he entered the kitchen, Paul was grumbling angrily… “Gloves pala ha, sige, tingnan natin…” (You want us to use gloves eh? Let’s see…)

He got a pair of gloves, put them on, AND glided his hands (emphasis on HE HAD THE GOVES ON) in the sink and some sort of a drainage gutter on the floor before getting another pair of gloves (for his crew mate) and got back to his post.

I don’t know if he only used the gloves to serve that particular guy or if he wore them for his entire shift…

Scary?

Wrong, (a resounding) YES… but hey, $hit happens.

That’s why (actually, even before I heard of this story) I try to be as polite as I can be (or, if possible, excessively so) whenever I’m at a restaurant (or in any other establishment for that matter). In addition to that, I am extra generous with “thank yous” whenever I ask/request for something from the restaurant’s crew.

It’s not hard at all to address a problem in a kind and polite manner. Besides, it’s your fellow human beings whom you are dealing with. Unless there are good reasons for you to blow your top off, or you’re suffering from some sort of superiority complex, there’s really no point in bossing people around. Don’t you agree?

Tuesday, August 26, 2008

James Bond Intro Gun Barrel (A Photoshop Tutorial)

I am very sure that most of you (if not all) are very familiar with James Bond films. This tutorial will guide you through the basic steps in creating the gun barrel thing that you see in the introduction of James Bond films. Take note, I said “basic”. I’ll leave it all up to you to add effects to this to make it more realistic-looking if it’s that you desire.

I was right with what I said in my “Camera iris diaphragm tutorial” that it can be modified to create this kind of effect. (smile)

But before anything else, I just thought I'd share with you about this amazing video course I accidentally came across recently. The car illustrations are just amazing! Watch the video below.


It's a paid tutorial though. But if you're interested, click on this link.

Now on to our James Bond Intro Gun Barrel tutorial. Have fun!

Step 1

Create a new 72 dpi-document sized 1024 pixels wide by 768 pixels tall


Step 2

Put a vertical guide at 512 pixels and a horizontal guide at 384 pixels. To do this, go to the “View” menu and click on “New guide” (you have to do this twice, one for the vertical guide and one for the horizontal guide). This should create guides that intersect at the exact center of your canvas.


Step 3

Make sure you’ve got “Snap To Guides” turned on. If you haven’t, go to the “View” menu, then “Snap To” and click on “Guides”.


(Note: A check mark beside “Guides” indicates that you already have “Snap To Guides” turned on.)

Step 4

Create a perfectly circular selection with a diameter of 220 pixels and position it at the exact center of your canvas. The easiest way to do this is to select the “Elliptical Marquee Tool” from the tool bar, then on the tool options (on the top of the screen) set the “Style” to “Fixed Size” and enter “220 px” for both the height and the width.


Then (with the “Elliptical Marquee Tool” still the active tool, left click on anywhere on your canvas to produce the selection.

With the “Elliptical Marquee Tool” still active, hover your mouse pointer over the selection (inside the selection) and click on (and hold) and drag the selection until its center “snaps” to the intersection of the two guides you have created earlier.


Step 5

Create a new layer, name it “hole” and (with the “hole” layer the active layer) fill the selection with any color (in this case I used green). It doesn’t matter what color you use as we will be modifying this later. For now, this will serve as our guide. Deselect the selection after you have filled it by pressing “Ctrl+D”.


Step 6

With the “hole” layer still the active layer, drag a vertical guide and let it snap to the right edge of the circle you’ve just created. To do this, hover your mouse pointer over the vertical ruler at the left side of your canvas and click (and hold) on it and drag your mouse pointer to the right. If you don’t see any rulers, just press “Ctrl+R” to make them appear.


Save your work as “bond.psd”.

Step 7

We will forget about what we’ve just done so far and we will work on something on a new canvas. But, do not close your work as we will go back to that later.

Now, create a new 72 dpi-document sized 1000 pixels wide by 1000 pixels tall


Step 8

With the “Ellipse Tool” selected, set it to “Fill pixels” (a) and “Fixed Size” (b) and enter “900 px” for both the height and width.

Also, set your foreground color to “black” (c).


Step 9

Create a new layer (you need not name this anymore since we will just use it to produce something which we will eventually move to the other canvas) and click and HOLD down your left mouse button on anywhere on your (new) canvas.

While still holding your left mouse button down, drag/move the circle’s outline until you can see a complete circle on your canvas.


RELEASE THE MOUSE BUTTON ONLY WHEN YOU SEE A COMPLETE CIRCLE ON YOUR CANVAS. (Note: We NEED to produce a perfect circle for this. If some part of your circle falls off to any of the edges of your canvas, your circle will not be rendered completely.) You should now have something like this:


Step 10

With the layer on which you created the black circle still the active layer, Drag a horizontal guide and let it snap to the horizontal center of the black circle you’ve just created.


With the guide in place, use the “Rectangular Marquee Tool” to create a rectangular selection that covers the entire upper half of the black circle and press “delete”. This will leave you with only half of a circle.


Step 11

Press “Ctrl+A” to select the entire canvas and press “Ctrl+C” to copy the half-circle.

Now, go over to your other canvas (the one that you saved as “bond.psd”) and click on the “Background” layer to activate it.

With the “background” layer activated, press “Ctrl+V” to paste in the black circle, this will paste your black circle on a new layer (named “Layer 1”). Rename that layer’s name to “wall” (to do this, simply double click on the layer’s name and type in “walls” and press enter). You should now have something like this:


Step 12

With the “wall” layer the active layer, click on the “Move tool” and drag the black half-circle (you have pasted in) until its right-most edge aligns with (snaps to) the right edge of the green circle. Also, make sure that the top edge of the half-circle snaps to the horizontal guide.

This is what you should get:


Step 13

Duplicate the “wall” layer by dragging the layer to the “Create a New Layer” button in the layers palette. This will create a new layer called “wall copy”.


With the “wall copy” layer the active layer, press “Ctrl+T”. Move the “pivot point” to the intersection of the first two guides you’ve created at the start of the tutorial. (Note: you will need to zoom in really close to be accurate with this… just press “Ctrl and +” for zooming in. Do not use the Magnifying tool as this will get you out of the free transform mode.)


While still in “Free Transform” mode, on the “transformation options” enter “42” for the rotation. Apply the change by clicking on the “check” on the upper portion of the screen.


Step 14

“Ctrl + click” on the thumbnail of the “wall copy” layer in the layers palette (to load its selection) and click on the original “wall” layer to activate it.

With the “wall” layer now the active layer, press the delete key. By this time, you may delete the “wall copy” layer as we will not need it anymore. You should now have something like this:


Step 15

Duplicate the “wall” layer once again and press “Ctrl+T”. With the “wall copy” layer active, as what you have done earlier, move the “pivot point” again to the intersection of the first two guides, enter “45” for the rotation this time, and apply the change.


You should now have something like this:


Step 16

Now, duplicate the “wall copy” layer. With the new layer (“wall copy 2”) active, go to “Edit”, then “Transform”, then select “Again” (or simply press “Shift + Ctrl + T”).


Do this 6 times over, making sure that active layer is the latest copy of the layer before applying “transform Again”.

When you’re done, you should have something like this:


Step 17

Merge all the “walls” layer into one single layer. To do this, select the topmost “wall” layer (in this case, the “wall copy 7” layer”) and press “Ctrl + E” seven times. (Either that or, if you’re using Photoshop CS, highlight all the “wall” layers by holding down the “Ctrl” key and clicking on all the “wall” layers one by one and when they have all been selected, press “Ctrl + E” once.) Whatever you do, just make sure that you merge together ONLY the wall layers.

Your layers palette should look like this:


Step 18

Now, “Ctrl + click” on the thumbnail of the merged “wall” layer in the layers palette to load its selection.

With the selection loaded, press “Shift + Ctrl + I” to invert the selection.

Step 19

Create a new layer on top of the “wall” layer and name it grooves.


With the “grooves” layer the active layer, fill the loaded selection with grey. Any shade of grey will do as all the colors that we’ve added so far are temporary, we will modify all the colors shortly. As a matter of fact you can use any color for this at this point.

After filling the selection with color, press “Ctrl + D” to deselect. By this time you should have something like this:


Step 20

Double click on the thumbnail of the “wall” layer to invoke the “Layer Style” window.

In the “Layer Style” window, click on “Gradient Overlay” and set the gradient’s “Style” as “Radial”.


Now, click on the “gradient preview” bar (labeled “Gradient”) and apply the following colors in the “Gradient Editor” window:

#dfdfdf @ 0% location
#4e4e4e @ 35% location
# 000000 @ 100% location


Click on “Ok” to exit the “Gradient Editor” window, and click on “ok” again in the “Layer Style” window to close it.

Step 21

Right click on the “wall” layer and click on “Copy layer style”


Then right click on the “grooves” layer and click on “Paste layer style”

Step 22

Double click on the thumbnail of the “wall” layer again and (in the “Layer Style” window) click on “Bevel and Emboss” and apply the settings as shown below:


Step 23

Double click on the thumbnail of the “hole” layer and (in the “Layer Style” window) click on “Color Overlay” and choose a white color.


Click on Ok to close the “Layer Style” window and voila! We’re done!


With some more playing around you can add some fancy chrome-like finish to the walls (like adding some shiny parts and really dark parts to it) and add an image to the “hole”.

Below are my other tutorials:

Six-Blade Camera Iris Diaphragm

Old-Style Radio Knobs

Make a Realistic LCD HDTV in Photoshop from Scratch

Aging Road Sign

SM City North EDSA Undergoes a Major Facelift

It’s been going on for several months now… but it was only recently that I was able to buy a new set of rechargeable batteries for our digital camera. Hence, this post… (get the connection?)

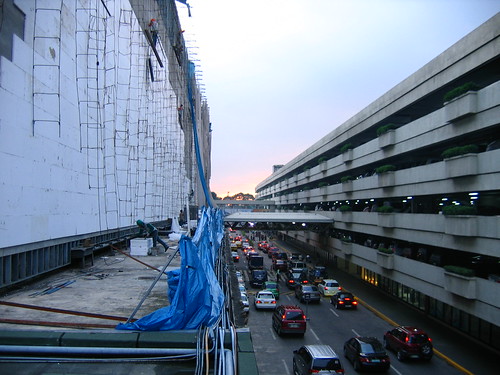
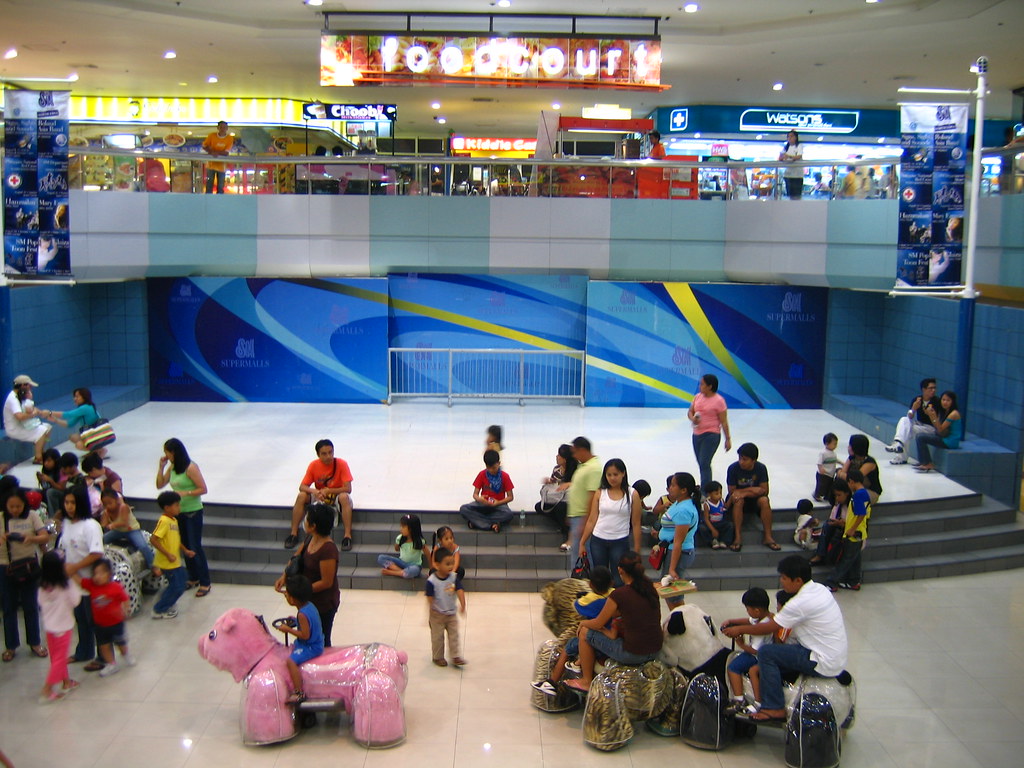
23 years, that’s how long it’s been standing there… the first SM “supermall”.

SM City, that’s how it was called before… but now, with so many SM “Cities” popping up everywhere like pimples on an adolescent’s face, you have to refer to it as “SM City North EDSA” or “SM North” to avoid confusion.

I cannot recall how the place looked like in its first few years of existence, though I was quite surprised at what I saw when I got to visit it again (some time in 2000) after so many years of not going there. For one thing, the interior of the original structure looked (and still is) pretty gloomy and crowded. Quite visually unappealing if you’ll ask me.

Anyway, heare’s how it looks today…

SM City North Edsa Undergoing a Facelift

SM City North Edsa Undergoing a Facelift

SM City North Edsa Undergoing a Facelift

SM City North Edsa Undergoing a Facelift

Inside SM City North Edsa

Inside SM City North Edsa

Inside SM City North Edsa

Inside SM City North Edsa

Thursday, August 21, 2008

DISQUS Commenting System

I’ve already mentioned about this on my “Shout Box” (Speak Your Mind), but, just to make this more noticeable to everyone, I’ll put this up here.

I had been looking around for things to add on to my blog and found something called “DISQUS” which, according to the testimonials posted on its website (http://disqus.com), is great to have on any blog site.

From DISQUS’s website:

Disqus is a powerful comment system that easily enhances the discussion on websites.

In minutes, connect your community with those of over 25,000 other websites.

Track conversations across the web, plus bridge discussions with your favorite services such as FriendFeed and Plaxo.

Threaded replies reveal the conversations in your comments.

And now it's easier to keep the discussion alive with email and mobile replying.

Features such as ratings and video comments make comments interactive and expressive.

An intuitive admin section makes it easy to moderate the discussions from one or multiple websites.

Disqus is easy to customize, with widgets that lets your audience become your community.

With search engine-friendly plugins and complete data sync, Disqus is as safe to use as it is easy.

Why do people write more comments on sites using Disqus? It's because we believe that there's no difference between a great comment and a great blog post.

With greater control and commenter profiles, people feel good about taking the time to speak (or type) their minds.


So, I was convinced to try it out.

Unfortunately, by changing my commenting system to DISCUS, all existing comments on this here blog got wiped out. Well, not exactly…

I had been informed that I would lose all my existing comments if I decide to apply the new commenting system to all my posts (well, I think saying “hidden” would be more proper than “lost” really)… I had another option which was to put up the DISQUS commenting system only to new posts which would leave all the existing comments intact.

Well… I decided to have the new commenting system applied to all my posts for uniformity.

Having that said, I would like to thank all the wonderful people (all three of you, namely Jill, Tesha, and Carlota) for taking the time to comment on my entries. I appreciate them a whole great lot! With that, please accept my apologies for doing what I did… and please do not let this be a discouragement to you for commenting some more in the future. I will make it a point not to let this happen again for as long as DISQUS shall exist (which I hope will be for a very long time)… I think if it’s as good as they say it is, with only over 25,000 registered sites right now, it can only get better…

Now, I can only wait and see how good this DISQUS thing really is… you may want to help me out with that…

Wednesday, August 20, 2008

Cost of Living in the Philippines in 2008 (Part 3)

This is "Part 3" of my "Cost of Living in the Philippines in 2008" series. This part consists of everything else that I was uncomfortable in including in the first two parts.

Although much care is taken in assuring that all information provided herein are correct, some errors MAY still be present... after all, I'm only human. As such, you SHOULD subject the information contained herein to further verification before using them for whatever reason. Everything contained herein are subject to change over time.

(Just to give reference points, I’ll be including the latest monetary exchange rates and the minimum daily wage in every post I make regarding this matter)

Philippine Peso Exchange Rate:
to the U.S. Dollar = P45.59527 (as of August 20, 2008 – 1:27 pm)
to the Euro = P67.01274 (as of August 20, 2008 - 1:28 pm)

Minimum Daily Wage (as of August 20, 2008): P382.00

Hygene: (Data Gathered are from August 18, 2008 at SM Manila)
  • Shampoo:

    • Head & Shoulders (200 ml): P87.75
    • Pantene (200 ml): P84.75
    • Palmolive (200 ml): P79.75
    • Sunsilk (200 ml): P78.75
    • Rejoice (200 ml): P73.75
    • Vaseline (200 ml): P73.75
  • Bath Soap:

    • Safeguard (90 g): P19.75
    • GreenCross (100 g): P19.75
    • Palmolive (90 g): P17.75
  • Toothpaste:

    • Colgate (150 ml): P72.50 to P77.50
    • Close Up (150 ml): P61.75 to P72.50
  • Toothbrush: P27.75 to P129.75 (depending on the brand)

Laundry Soap/Detergent:

  • Surf (Kalamansi bar – 429 g): P17.25
  • Surf (Kalamansi powder – 1 kg): P61.95
  • Tide (“original” bar – 130 g x 3): P24.25
  • Tide (“original” powder – 1.12 kg): P91.75
  • Champion (blue bar – 440 g): P18.50
  • Champion (powder – 1 kg): P88.75
Entertainment: (Data Gathered are from August 16, 2008 at SM San Lazaro)
  • Movie Ticket: from P120.00 up
  • Internet Café (Excel):

    • Internet Access: P15.00/30 minutes
    • Games: P25.00/hour
  • Original Copy/Release DVDs: P150.00 up
  • Example:

    • Indiana Jones 4-DVD box set: P999.50
    • The Assassination of Jesse James: P475.00
    • 10,000 B.C.: P599.00
    • Sweeney Todd: P699.00
    • Toy Story (10th Anniversary): P350.00
    • National Treasure 2: P750.00
    • The Simpsons Movie: P550.00
    • Windtalkers: P299.00
    • Rush Hour: P199.00
    • SAW IV: P375.00
    • The Scorpion King: P150.00
  • Original Copy/Release VCDs: P75.00 up
  • Example:

    • Sweeney Todd: P275.00
    • Blade Trinity: P75.00
    • Resident Evil Apocalypse: P99.00
    • Outbreak: P60.00
    • Hitman: P275.00
    • Harry Potter – Chamber of Secrets: P150.00
    • Gladiator: P125.00
  • Original Copy/Release Audio CDs: P50.00 up
  • Example:

    • Usher – Here I Stand: P375.00
    • Josh Groban – Closer: P450.00
    • Journey – Revelation: P495.00

Newspaper (as of August 20, 2008):

  • Broadsheet (Philippine Daily Inquirer):

    • Monday to Saturday: P18.00
    • Sunday: P20.00
  • Tabloid (People’s Tonight): P8:00

Click here for Part 1

Click here for Part 2

Cost of Living in the Philippines in 2008 (Part 2)

This is "Part 2" of my "Cost of Living in the Philippines in 2008" series. This part consists primarily of food and beverage. Pardon me for putting "creamer" inside "beverages" as I don't know exactly what category it should be included in. Anyway, the prices indicated below are SM Supermarket prices (particularly SM Manila's) gathered on August 18, 2008 (Monday) unless otherwise specified.

Gathering all these information took me about a little less than two hours of running up and down the aisles and listing down the prices manually (with pen and paper), with people staring at me much of the time (also, I think some of the supermarket personnel were suspicious of me... either that or I'm just being paranoid). For this, I would like to emphasize that although much care is taken in assuring that all information provided herein are correct, some errors MAY still be present... after all, I'm only human. As such, you SHOULD subject the information contained herein to further verification before using them for whatever reason. And of course, all these are subject to change from over time.

Just for the record, I did buy a few things during my wandering... a carton of Cowhead Pure Milk (1 liter carton), a 300-gram bag of Milo, a 170-gram box of Nestle Coco Crunch, and a (big) refill bag of Joy (Antibac) dishwashing liquid (the price of which I didn't bother to take down anymore).

(Just to give reference points, I’ll be including the latest monetary exchange rates and the minimum daily wage in every post I make regarding this matter)

Philippine Peso Exchange Rate:
to the U.S. Dollar = P45.59527 (as of August 20, 2008 – 1:27 pm)
to the Euro = P67.01274 (as of August 20, 2008 - 1:28 pm)

Minimum Daily Wage (as of August 20, 2008): P382.00

Rice:
  • Dinorado (Bonus – 25 kg): P1260.00 (or P50.40/kg)
  • Sinandomeng (Harvester’s – 2 kg): P114.5 (or P57.25/kg)
  • Wagwag (Bonus): P52.50/kg
Beverage:
  • Milk

    • Powdered Filled Milk:
      • Nestle Bear Brand (900 g can): P279.50
      • Alaska (800 g can): P242.50

    • Full Cream Milk Powder:
      • Birch Tree (900 g can): P374.50
      • Nido (900 g can): P339.50

    • Fresh Milk:
      • Cowhead (1 Liter carton): P67.50
      • Nestle Fresh (1 Liter carton): P63.50
  • Kids’ Energy (Choco-Malt) Drink:

    • Milo (300 g): P57.50
    • Ovaltine (330 g): P59.50
  • Coffee:

    • Nescafe Classic (200 g in jar): P199.50
    • Nescafe Classic (110 g refill): P69.50
    • Nescafe Classic (50 g refill): P34.50
    • Nescafe Decaf (200 g in jar): P279.50
    • Nescafe Gold (200 g in jar): P419.50
  • Non-Dairy Creamer:

    • Nestle Coffee-Mate (Original)
      • 170 g: P59.50
      • 80 g (refill pack): P19.95
      • 200 g (refill pack): P40.00
      • 450 g (refill pack): P89.50
  • Soda:

    • Bottled:
      • Coke (“Sakto” 200 ml): P5.50
      • Coke (8 oz.): P8.00
      • Coke (12 oz.): P10.00
      • RC Cola (240 ml): P5.00

    • In Can (330 ml):
      • Coke: P18.00
      • Coke Light: P20.00
      • Sprite: P18.50
      • Royal Tru-Orange: P18.50
      • Pepsi: P17.50
      • Pepsi Light: P17.50
      • 7-up: P17.25

    • In PET Bottle (500 ml):
      • Coke: P21.00
      • Coke Light: P22.50
      • Royal Tru-Orange: P21.00
      • Pepsi: P20.00
      • Mountain Dew: P20.00
      • Mirinda: P20.00
  • Beer (in can - 330 ml):

    • San Miguel (Pale Pilsen): P26.50
    • San Miguel (Super Dry): P32.50
    • San Miguel (Strong Ice): P32.50
    • San Mig Light: P27.50
    • Red Horse: P26.50
    • Colt 45: P24.50
  • Bottled Water (500 ml):

    • Summit: P11.50
    • Absolute: P12.50

Breakfast Cereals:

  • Nestle Coco Crunch (170g): P74.50
  • Nestle Corn Flakes (150g): P59.50
  • Kellogg’s Frosties (175g): P74.50
  • Kellogg’s Corn Flakes Classic (150g): P66.50

Dairy Products:

  • Cheese:
    • Kraft Eden Filled Cheese Original (180 g): P33.00
    • Magnolia Cheezee Filled Cheese (185 g): P37.00
    • Magnolia Cheddar (185 g): P59.00
    • Kraft Cheddar (180 g): P61.00
    • Kraft Cheez Whiz (220 g): P58.50
  • Butter:
    • Anchor (Salted/Unsalted) 227 g: P78.00
    • Lurpak (Salted/Unsalted) 200 g: P154.00/P156.00
  • Margarine:
    • DariCreme Classic (225 g): P37.00
    • Magnolia Buttercup (225 g): P31.00
    • Selecta Butterfresh (225 g): P25.00

Condiments:

  • Sugar:

    • Hermano Washed Sugar (1 kg): P33.25
    • Peacock Brown/Cane Sugar (1 kg): P29.75
    • Peacock White Sugar (1 kg): P38.25
    • Bonus Brown/Cane Sugar (1 kg): P29.50
    • Bonus White Sugar (1 kg): P38.00
  • Iodized Salt:

    • Bonus (500 g): P8.00
    • P.V.L. (500 g): P9.50
    • Marco Polo (500 g): P13.50
    • McCormick (140 g – shaker): P15.50
  • Soy Sauce:

    • Silver Swan (385 ml): P12.25
    • Marca Piña (500 ml): P18.00
    • Bonus (350 ml): P8.50
  • Vinegar:

    • Datu Puti (385 ml): P10.85
    • Bonus (350 ml): P7.50
    • Marca Piña (385 ml): P10.95

Cooking Oil:

  • Golden Fiesta Soya Oil (1 Liter): P126.50
  • Golden Fiesta Canola Oil (1 Liter): P144.50
  • Golden Fiesta Palm Oil (950 ml): P108.60
  • Bimoli Vegetable Oil (1 Liter): P103.50
  • Minola Lauric Oil (1 Liter): P103.25
  • Baguio Vegetable Oil (1 Liter): P106.00

Chicken Eggs (Medium – 1 dozen):

  • Bonus: P57.00
  • Masagana: P59.00
  • Bounty Fresh: P59.00

Chicken (Magnolia Brand):

  • Quarter Cut: P118.00/kg
  • Breast: P138.00/kg
  • Drumstick: P145.00/kg
  • Wings: P145.00/kg
  • Whole Leg: P138.00/kg
  • Whole Chicken: P117.00 to P120.00 per kg

Pork (SM Bonus Brand):

  • Pork Belly (w/ skin on): P156.00/kg
  • Menudo Cut: P165.00/kg
  • Pork Cubes: P167.00/kg
  • Shoulder/Kasim (w/ skin on): P148.00/kg
  • Pigue (leg/ham): P148.00/kg

Beef:

  • Oxtripe: P107.00/kg
  • Short Ribs: P182.00/kg
  • Beef Rump: P200.00 to P250.00 (as of August 14, 2008 from http://www.bas.gov.ph)
  • Beef Brisket: P160.00 to P200.00 (as of August 14, 2008 http://www.bas.gov.ph)

Fish:

  • Galunggong: P132.00/kg
  • Tulingan: P148.00/kg
  • Dalagang Bukid: P170/kg
  • Bisugo: P200.00/kg
  • Pampano: P270.00/kg
  • Danggit: P145.00/kg
  • Labahita: P201.00/kg
  • Lapu-Lapu (black): P420.00/kg
  • Bangus: P120.00 to P130.00 pr kg
  • Tilapia: P94.00/kg

Vegetable:

  • Ampalaya (Bitter Gourd): P56.00/kg
  • String Beans: P39.00/kg
  • Native Tomato: P49.00/kg
  • White Onion: P67.00/kg
  • Red Onion: P87.00/kg
  • Garlic: P34.00/kg
  • Ginger: P124.00/kg
  • Eggplant: P30.00/kg
  • Squash: P24.00/kg
  • Cucumber: P63.00/kg
  • Sayote: P26.00/kg
  • Baguio Beans: P64.00/kg
  • Carrots: P64.00/kg
  • Pechay Baguio: P34.00/kg
  • Potato: P47.00/kg
  • Okra: P29.00/kg
  • Cabbage: P35.00/kg
Click here for Part 1

Click here for Part 3

Friday, August 15, 2008

Jeepney Ethics

image from http://www.globalvoicesonline.org/wp-content/uploads/2007/12/jeepney_wikipedia.jpg
“If a man be gracious and courteous to strangers, it shows he is a citizen of the world, and that his heart is no island cut off from other lands, but a continent that joins to them.” (Francis Bacon, Sr.)

Haven’t we been taught time and again (in school, at home, and in the workplace) about how to be polite and courteous towards our fellowmen/women? Haven’t we been taught about manners and ethics? Haven’t we been taught about what’s right and what’s not? I just can’t understand why, at times, we seem to forget being the civilized, educated, and logical beings that we are.

For so many years I have been taking jeepneys (as well as FXs) to go to wherever, I can’t help but notice the lack of courtesy among many of my fellow passengers/commuters. It infuriates me to see people not showing any bit of care for others. What can you lose if you would go out of your way to contribute (in some miniscule ways) to the greater benefit of others? We’re only talking about moving an arm or leg or shift a few millimeters to the right or left here! It’s that simple! Good grief!

For the benefit of everyone, be nice… be courteous… do these when you’re riding the jeepney…
  1. When getting on a jeepney that is already crowded with people, make it a habit to say “excuse me” as you go down the aisle to find a seat.
  2. When paying, especially if you’re seated at the tail end of the vehicle, POLITELY ASK the other passengers to pass your fare on to the driver. Do not just say “bayad po” and expect the other passengers to get your fare and pass it on to the driver. Or worse, do not just extend your arm with your fare in your hand without saying a word and expect someone to react to that!
  3. Always make it a point to thank the person/passenger to whom you passed your fare to.
  4. If you hear somebody asking for a favor to pass his/her fare on to the driver, please always try to make an effort to do so. Don’t just sit there and act as if you’re not hearing or seeing anything. Remember, you’ve asked for the same favor before and will surely be asking for the same again and again for as long as you ride jeepneys.
  5. If you get on a jeepney that’s empty, pay the driver as soon as you are seated. Don’t wait for someone else to get on and wait for the moment that he/she pays his/her fare and ask him/her to hand your fare to the driver along with his/hers.
  6. Always make an effort to sit properly in a manner that will allow passengers (who get on after you) to find their seats easily. Don’t wait for someone to ask you to move before doing so. If you got on a jeepney that is already crowded, try to sort of “squeeze” yourself against the person sitting next to you.
  7. If you feel that the person next to you is “pinning” you, try to flow with it and move yourself in the same direction and “squeeze” yourself against the other person sitting next to you.
  8. Sit straight (perpendicular to the backrest) and try to keep your arms and legs directly in front of you. Guys, try to put your knees as close together as possible, it makes no sense at all to sit with your legs spread widely apart unless you have hernia. Also, if you need to hold on to the ceiling handle bar, please hold on to the bar with your arm(s) directly in front of you. Don’t extend your arm to the side and cover the face(s) of the person(s) you’re sitting next to. And girls (and some guys as well), as I have already mentioned, sit perpendicularly to the backrest, sitting at a 45 degree angle may be more comfortable, but you’re occupying more than one person’s worth of seating space.
  9. If someone is getting off (or on) and you are holding on to the handle bar, put your hand down for a while, at least until after he/she goes past you. Doing this will give him/her something to hold on to to aide his/her balance as he/she goes down the aisle.
  10. Those of you who have long hair, always (ALWAYS) bunch up your hair and swing it over your shoulder (to your chest). If it’s not that long… well… the bottom line is DON’T allow your hair to fly onto the face of the person sitting next to you!
  11. AS MUCH AS POSSIBLE, put your bag (or whatever it is you are carrying) on your lap. Not on the floor/aisle or on the seat (unless you are going to pay for the seating space occupied by your bag). Try to make an effort in keeping the aisle free of any obstruction.
  12. AS MUCH AS POSSIBLE, try to position whatever it is you are carrying in such a way that it is not obstructing the passage way or invading the space of other passengers.
  13. DO NOT SMOKE!
  14. If you need to get off, say so! DO NOT knock on the ceiling. DO NOT make that squeaking sound with your lips. DO NOT whistle. DO NOT make THAT hissing sound. It doesn’t take much more effort to say “para po” or “diyan lang po sa tabi” than to do any of those things.
  15. If someone gets off at a location that is relatively close to where you are getting off (like a few feet/meters away), please get off already!!! For Pete’s sake, use your legs and walk once in a while!
  16. If it’s raining and you’re carrying a wet umbrella, fold your umbrella as soon as you get on the vehicle and try to avoid letting it touch anyone’s legs.
  17. Try not to sleep while you’re on the jeepney because it’s very likely that you’ll be using one of the persons you’re sitting next to as your pillow.
  18. If you’re eating/drinking something inside the jeepney, please take the containers/wrappers with you when you get off. DO NOT leave them in the vehicle unless the jeepney you’re on has a waste basket. Never ever hurl them out the window. Same goes with gums.
  19. If you are the only one seated on the front seat, please move yourself towards the driver if someone else is going to sit in front with you and allow him/her to take the outer seating space. If you want to keep the outer seat, get off first and allow the other person to get in before climbing back to your seat. Do not try to contort your body in a show of effort in letting the other person pass because the “extra” space you’ll be creating will not be big enough to allow for a trouble-free passage for any person (of any size).
  20. If you are seated at the outer side of the front passenger seat and the person beside you is getting off, get out of the vehicle and allow him/her to get off easily. I repeat, do not just contort your body (and try to squeeze yourself deeper into your seat) because the “extra” space you’ll be creating will not be big enough to allow for a trouble-free passage for any person (of any size).
  21. Guys, let’s be gentlemen… and ladies, don’t be prima donnas. Let’s all be courteous to one another and we’ll all be happy.
Thank you.
 

blogger templates | Make Money Online