Whenever I’m asked by someone to teach him/her how to use Photoshop, the first thing I ask them is what it is specifically that they want to do in Photoshop.
Well, aside from the obvious of being a graphics editing software/program, Photoshop has tons of capabilities, and I do mean TONS! You can resize images with it, crop images with it, modify/edit images with it, create art with it, the list just goes on and on. And along with that much capability, there are also TONS of things to learn about it.
Learning how to use Photoshop is pretty easy, even on your own, as it is (in my opinion) very user-friendly and, to a great extent, very straight forward. But as I have already mentioned, there are so many things to learn about it that even I, who have been using it for more than 8 years now, still have a lot left to learn (and, again, I do mean A LOT). You will see proofs of this as we go along.
So, ladies and gents, here we go.
Wait, I almost forgot to mention something. The Photoshop screen/interface, or “workspace” as it is properly called, is highly customizable. What this means is that you can “set” the Photoshop workspace in such a way that it will let you work more comfortably and efficiently. Almost everything you see on the Photoshop workspace can be hidden, displayed, and arranged depending on your preferences and/or needs.
Photoshop may have a lot of tools, but there will certainly be a whole bunch of it that you won’t need for any specific type of job. So, it's common practice to a lot of (if not all) Photoshop users to "hide" the things that are not needed so as not to clutter up the screen too much.
Now, why am I telling you this? I’m just thinking that if you’ll be using Photoshop that’s installed on someone else’s computer, don’t panic if what you see on your screen does not match the screen shots in my tutorials. Rest assured, I will try my best to give instructions every step of the way, including how to make things appear and/or disappear.
Another thing, whatever Photoshop version you will be using should not be much of an issue as they are pretty much similar. It’s just that newer versions have more features than older ones. And since I’m going to talk only about the basics, I probably won’t be dealing with them, at least not just yet.
Now, we start.
Upon Starting/Launching/Running Photoshop
For those using Windows-based machines, the big gray area that you will see when you run Photoshop IS NOT the “canvas”. (By the way, depending on your desktop theme, the area I’m talking about may not be gray, it may be some other color. Take a look at the following screenshot and see what space/area I am talking about).
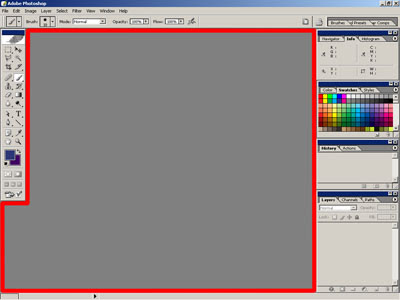 The area/space inside the red outline is the “big gray area” I’m referring to.
 So, what does it mean if the big gray space is not a canvas? Well, no matter what tool on the toolbar you click on, clicking and dragging it anywhere on the gray space will do nothing.

I don’t find the need to stress this to Mac users because instead of a big gray space, you’ll see your desktop wallpaper instead. Obviously, that means you’ve got nothing to work with.
What you should do upon launching/running Photoshop is to either open an image file or make yourself a canvas.
Opening an Image File
Opening an image file in Photoshop is very much like opening a file in any other program. Click on ‘File’ and then click on ‘Open’.

In the ‘Open’ window/dialog box that appears, find the file that you want opened, click on it, and click on the ‘Open’ button. Now you have a “canvas” to work with/on.

By the way, Photoshop can open a wide range of image file formats as well as a couple of “non-image” file formats. To see all the file formats that Photoshop recognizes/supports, click on the button at the end of the dropdown menu field labeled “Files of type”. For starters, I would advice you to stick with the JPEG (or .jpg) file format for now, unless you already know something about the other image file formats.
 A word of caution for those who are about to take or have taken this route. Read this VERY CAREFULLY and UNTERSTAND IT WELL. For those who opened an image file, BE VERY CAREFUL IN SAVING YOUR WORK! If you’ve just put a mustache on someone’s face or whatever it is that you will be doing or have already done, once you save your work and close that image, YOU WILL NEVER EVER BE ABLE TO RESTORE IT BACK TO ITS ORIGINAL STATE! So what I advise you to do is save your work with a different filename. JUST DON’T OVERWRITE THE ORIGINAL.
Creating a Canvas
To “create” a blank canvas, click on ‘File’ then ‘New’. A window will appear where you can specify your canvas’s dimensions, resolution, color mode, and background color.

For starters, just set the resolution at 72 pixels per inch. If it’s not set at 72 pixels per inch, click on the text field beside ‘Resolution’, delete the existing value, and key in “72”). If you don’t know anything about resolution and want to know what it is and what it is about, I have a little tutorial on it here.

For the height and width, I’ll leave them up to you. Just don’t make it so darn big or ridiculously small. By the way, Photoshop allows you to choose from several units of measurement with which to define your canvas’ dimensions (pixels, inches, centimeters, millimeters, points, picas, and columns). To select a unit of measurement, simply click on the button at the end of the dropdown menu field labeled “Height” (or “Width”) and click on the unit of measurement of your choice. (Note: Changing the unit of measurement of the height will also change the unit of measurement of the width and vice-versa)

If you’re not very good with measurements, you may want to just choose from the preset canvas sizes provided. To do so, simply click on the button at the end of the dropdown menu field labeled “Preset” and click on the canvas size of your choice.

We’ll leave the background color set to “White” for now. If it’s not set to “white”, click on the button at the end of the dropdown menu field labeled “Background Contents” and click on ‘White’.


As for the ‘Color Mode’, just make sure it’s set to ‘RGB’ and ‘8 bit’. If it’s not set to ‘RGB’ and ‘8 bit’, I suppose you already know what to do.

Just ignore anything else that you might see on the “New” window/dialog box.
Now, click on the ‘Ok’ button and Voila! You now have your very own blank canvas.
Saving Your Work
Just like in any other programs, saving your work in Photoshop is very easy. Simply click on ‘File’ and then ‘Save’. That’s it... well, not really. Since Photoshop supports a big bunch of file formats, it provides you with as much formats with which to save your work. Choosing the file format with which to save your work depends on a wide variety of factors which includes number of colors, image quality, presence of additional/custom channels, and presence of “layers”, among others. But talking about this will provide enough material for another article. I’ll probably make a discussion on this next.
Anyway, (again, unless you already know something about the different file formats) to make sure that you’ll be saving your work with everything that you will be doing or have done (consciously or otherwise) intact, it would be best that you just go with whatever format Photoshop recommends you to save your file in.

If you are clueless about this, it would be best for you to just leave the “Format” as it is (the format you see on this screenshot may not be the same as what you might see on your screen, it’s ok, don’t panic).
Depending on what you have in your work (please refer to above mentioned factors), if you choose a format which is not compatible with your work, you may see messages warning you about stuff.
Experiment!
Now that you already know how to “produce” a canvas and save your work, I’ll leave you on your own for now. Just play around with the various tools that you see on screen. DO NOT BE AFRAID. Photoshop won’t bite you.



22.jpg)


 I tried digging for more information today about the upcoming Indiana Jones film (Indiana Jones and the Kingdom of the Crystal Skull) which is due to be released on May 22, 2008. But, instead of finding out more about the film, I ended up learning more about crystal skull(s).



 I got to watch “The Secret” a couple of months ago. Honestly, I think it’s full of bull crap. But then again, living in this time and age where you cannot believe in just anything (not even those that you can perceive with any of your senses), it’s probably just normal for me to think of it that way. Another thing, I was never a fan of self-help stuff.


 I’ve also stumbled upon some news somewhere before about a live-action Robotech movie being in the works, as well as one for Astroboy.


