
But before anything else, I just thought I'd share with you about this amazing video course I accidentally came across recently. The car illustrations are just amazing! Watch the video below.
It's a paid tutorial though. But if you're interested, click on this link.
Anyway, here's the Radio Knobs/Dials of the Past tutorial. It's a very long one. But I hope you learn a lot from it.
Step 1
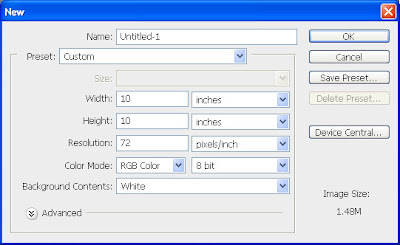
Create a new document 10 inches high by 10 inches wide at 72 dpi with white background.
Step 2
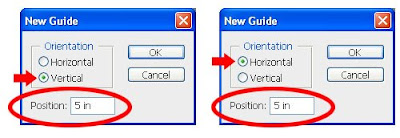
Put a vertical guide at 5 inches and a horizontal guide at 5 inches. To make your guides accurate to the measurements given, click on “View” then “New Guide”.
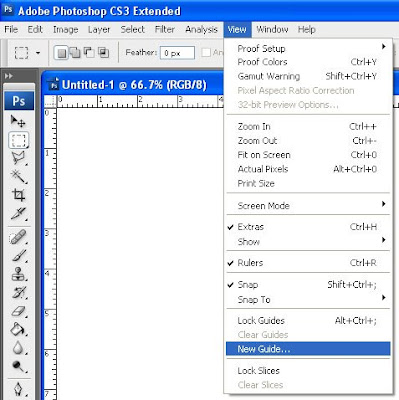
Do this twice, once for the vertical guide and once more for the horizontal guide.
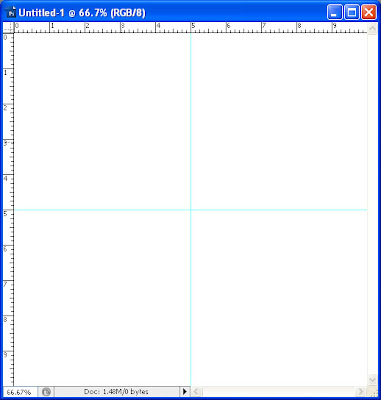
You should have two guides intersecting each other at the very center of your canvas (as shown below)
Step 3
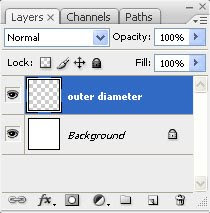
Create a new layer and name it “outer diameter”
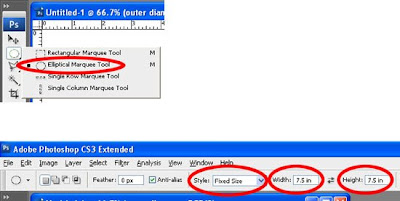
Click on the “Elliptical Marquee” tool and set the “Style” to “Fixed Size” and enter 7.5 inches for the height and 7.5 inches for the width.
Click anywhere on the canvas to make the selection.
Before you proceed, check if you have “snapping” turned on. For this, go to the “View” > “Snap To”. Make sure that “Guides” is checked.
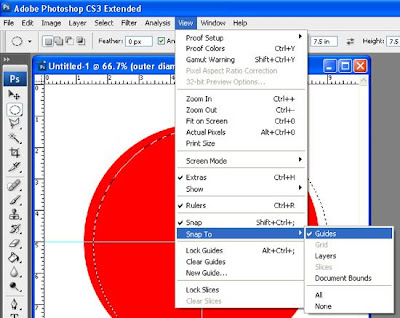
With the “Elliptical Marquee” tool, click anywhere inside the selection and drag until the selection snaps to center of the canvas.

Make sure that the “outer diameter” layer is the active layer, fill the selection with any color (in this case I filled it with red).
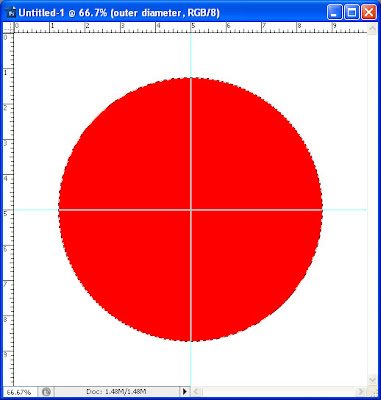
Remove the selection by pressing Ctrl+D.
Step 4
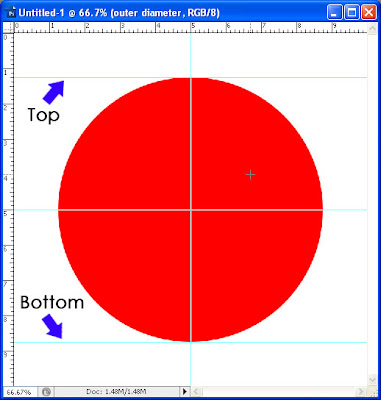
Put a horizontal guide at the top edge of the circle and another at the bottom edge. Do this by clicking and dragging down from the top canvas ruler until it snaps to the topmost edge of the circle. Do the same for the bottom edge. (Note: If you don’t see the rulers on your canvas, simply press Ctrl+R to make them appear.)
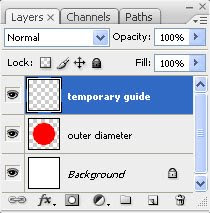
Create a new layer on top of the “outer diameter” layer and name it “temporary guide”
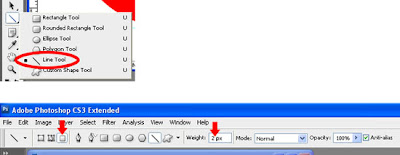
Click on the “Line” tool and enter the properties as shown in the screenshot below:
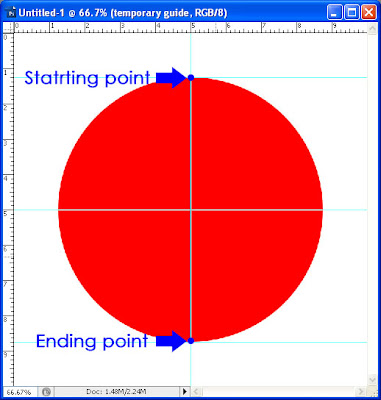
Using any color other than color of circle (in this case I used blue although you may not be able to see it clearly), draw a line starting from where the vertical center guide intersects with top horizontal guide and ending at where the vertical center guide intersects with bottom horizontal guide
With the “temporary guide” layer being the active layer, press Ctrl+T and rotate the line by -2.5 degrees.
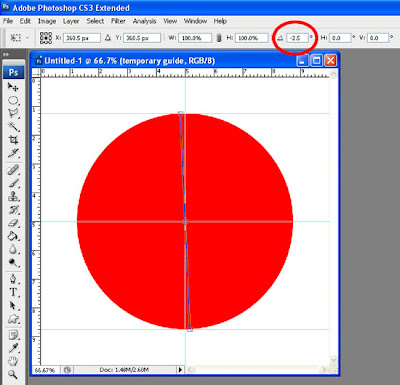
Apply the change.
You can now remove/delete the top and bottom guides to avoid unnecessary snapping later on. To do so, click on the “move” tool then point the mouse pointer on the guide to be removed, click and drag it off of the canvas.
Step 5
Create a new layer on top of the “temporary guide” layer and name it “jagged edges”
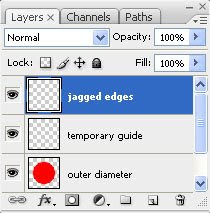
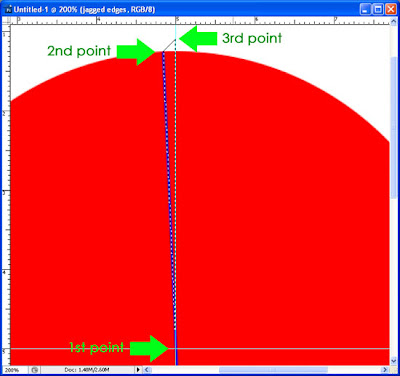
At this point we will create a triangular selection using the “Polygonal Lasso” tool. I would advise you to zoom in your canvas until such a point where only the top half of the circle is showing.
The first point of the selection should be at the center of the canvas/circle, so, move your mouse pointer there and click once. After you’ve set your first point, follow the line that you’ve drawn on the “temporary guide” layer to where it intersects with the outer edge of the circle, click once again there (that is your second point). Next, press and hold the “Shift” key and move your mouse pointer slightly upwards and to the right towards the vertical center guide. When the selection line slants at a 45 degree angle and meets with the vertical center guide, click there again (this is your third point). For your fourth and final point, click on your first selection point which is at the center of the canvas/circle (this will complete the selection).
Make sure the “jagged edges” layer is the active layer, fill the selection with any color (In this case I used black).
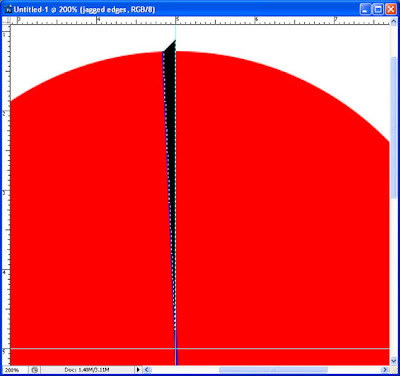
Press Ctrl+D to deselect.
At this point you can delete the “temporary guide” layer (drag the “temporary guide” layer to the “Delete layer” icon at the bottom of the “Layers” palette).
Step 6
Duplicate the “jagged edges” layer by dragging the layer to the “Create new layer” icon in the “Layers” palette.
With the “jagged edges copy” layer active, go to “Edit” > “Transform” > “Flip Horizontal”
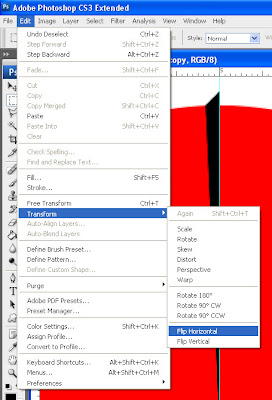
With the “Move” tool, press and hold the “Shift” key and drag the “jagged edges copy” layer until the left edge of the triangle snaps to the vertical center guide.
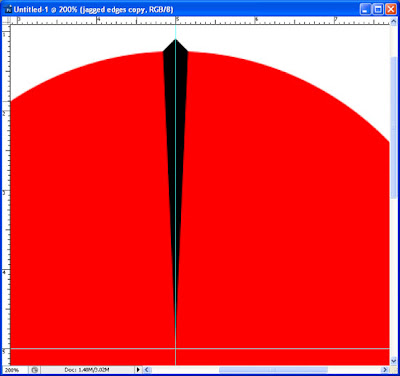
With the “jagged edges copy” layer still active, press ctrl+E to merge it down to the original “jagged edges” layer. Now you have only one “jagged edges” layer
Step 7
Duplicate the “jagged edges” layer again.
With the “jagged edges copy” layer as the active layer, go to “Transform” > “Flip Vertical”. Then while holding the shift key, drag the diamond-like shape down until its left and right corners are resting on the lower edge of the circle.
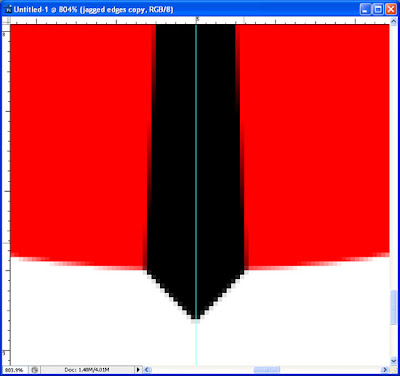
Merge the “jagged edges copy” layer with the “jagged edges” layer.
Step 8
Duplicate “jagged edges” layer yet again.
Make sure that the “jagged edges copy” layer is the active layer, then go to “Edit” > “Free Transform” and rotate it by 5 degrees.
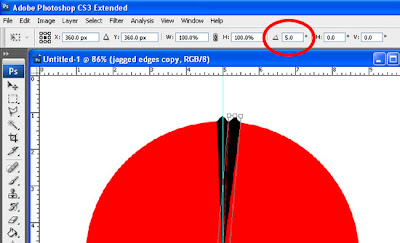
Apply the change.
Now, duplicate “jagged edges copy” layer.
With the “jagged edges copy 2” layer active, go to “Edit” > “Free Transform” and rotate it by 5 degrees.
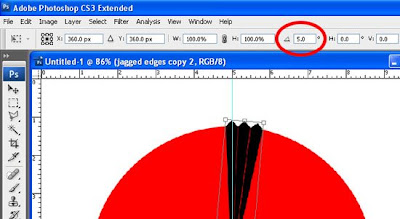
Apply the change.
Merge the “jagged edges”, “jagged edges copy” and “jagged edges copy 2” layers by pressing “Ctrl+E” twice
Note to Photoshop CS3 users: You can select all three layers (by holding the Ctrl key and clicking on each of the layers) and merge them by pressing Ctrl+E once. However, doing this will result to a layer named “jagged edges 2”. In this case, rename it back to “jagged edges”
Step 9
Duplicate “jagged edges” layer again
With the “jagged edges copy” layer the active layer, go to “Edit” > “Free Transform” and rotate it by 15 degrees.
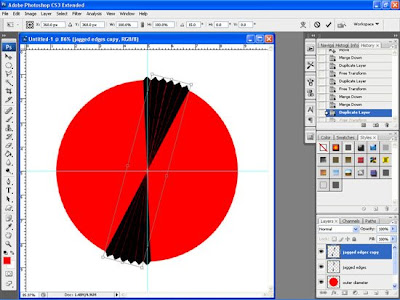
Apply the change.
Duplicate “jagged edges copy” layer
With the “jagged edges copy 2” layer the active layer, go to “Edit” > “Free Transform” and rotate it by 15 degrees.
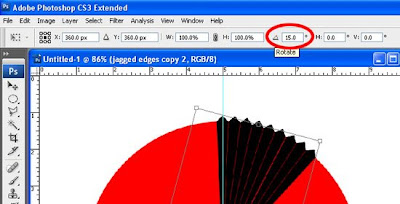
Apply the changes.
Merge the “jagged edges”, “jagged edges copy”, and “jagged edges copy 2” layers by pressing Ctrl+E twice.
Step 10
Duplicate “jagged edges” layer yet again.
With the “jagged edges copy” layer the active layer, go to “Edit” > “Free Transform” and rotate it by 45 degrees.
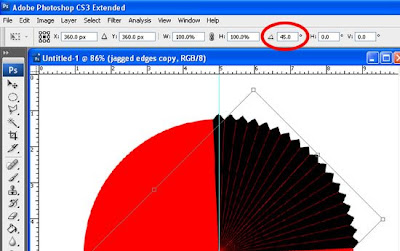
Apply the change.
Merge the “jagged edges” and “jagged edges copy” layers by pressing Ctrl+E once.
Step 11
Duplicate “jagged edges” layer once more
With the “jagged edges copy” layer the active layer, go to “Edit” > “Free Transform” and rotate it by 90 degrees.
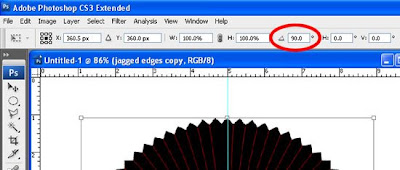
Apply the change.
With the “jagged edges” still active, press Ctrl+E twice to merge the “jagged edges”, “jagged edges copy”, and “inner diameter” layers.
Step 12
Double click on the “outer diameter” to apply layer styles to it.
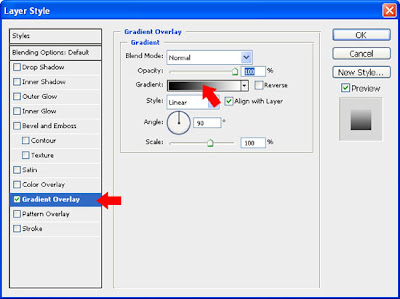
On the “Layer Styles” window, click on “Gradient Overlay”.
In the “Gradient Overlay” options pane, click on the gradient to bring up the “Gradient Editor” window.
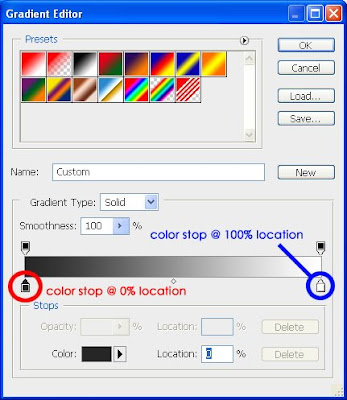
In the “Gradient Editor” window, place a “Color Stop” at 0% location with the color of #262626 and another “Color Stop” at 100% location with color white. (Note: To modify the color of a “Color Stop”, first click on the “Color Stop” that you want to modify then click on the “Color” located at the bottom of the “Gradient Editor” window. When you’re done with your changes, click on “OK”. You will then be brought back to the “Layer Styles” window.)
Back in the “Layer Styles” window (Gradient Overlay options pane), set the gradient angle to 45 degrees. I left everything else in their default settings. But, to be sure, compare your screen with the screenshot below.
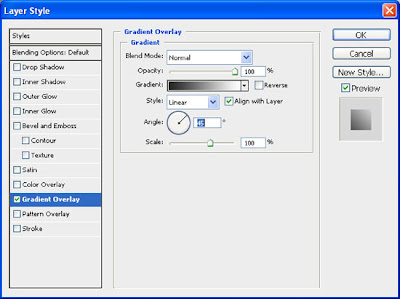
Click on “OK” to close the “Layer Styles” window.
Step 13
Duplicate the “outer diameter” layer.
Rename the “outer diameter copy” layer to “inner diameter”
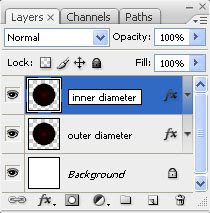
With the “inner diameter” layer active, go to “Edit” > “Free Transform” and scale the layer down to 70%. (Make sure that the “Maintain aspect ratio” button is activated).

Apply the change.
Step 14
Double click on the “inner diameter” layer to bring up the “Layer Styles” window again.
On the “Layer Styles” window, click on “Gradient Overlay”.
In the “Gradient Overlay” options pane, click on the gradient to bring up the “Gradient Editor” window.
In the “Gradient Editor” window, place a “Color Stop” at 0% location with the color of #464646 and another “Color Stop” at 100% location with the color of #a6a6a6.
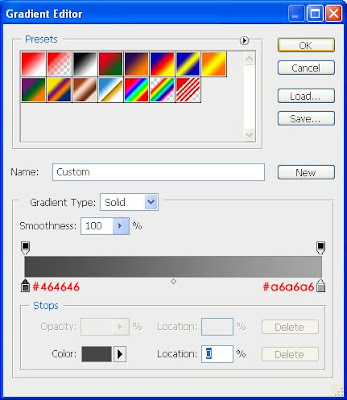
Close the “Layer Styles” window.
Step 15
Create a new layer between the “inner diameter” and “outer diameter” layers and name it “jagged edges 1”
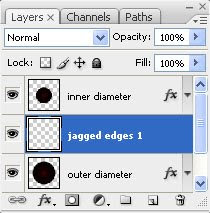
With the polygonal lasso tool, click on the center of the canvas (where the vertical and horizontal center guides intersect) to set the first selection point. Next, move the pointer to the outside of the shape of the “outer diameter” layer making sure that the line of the polygonal lasso tool intersects with the left “valley” of the topmost “tooth”, click there for the second point.
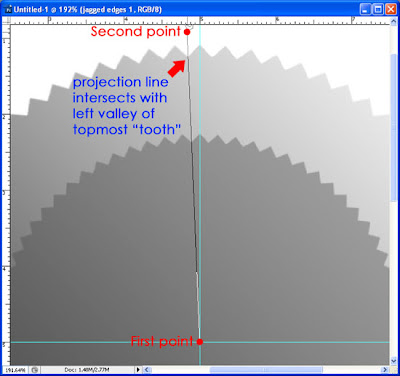
For the third selection point, move the pointer to the right and let it snap to the vertical center guide and click there. Close the selection either by clicking on the first selection point at the center of the canvas or double clicking after you placed the third selection point.
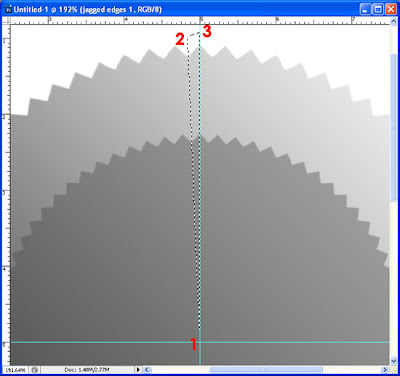
Press and hold the Ctrl+Shift+Alt keys and click on the “outer diameter” layer, this will deselect the area outside the shape of the “outer diameter” layer.
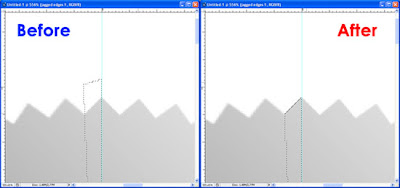
With the “jagged edges 1” layer the active layer, fill the selection with any color (in this case I used red)
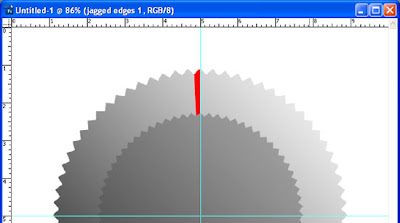
Step 16
Duplicate the “jagged edges 1” layer and rotate the duplicate by 180 degrees.
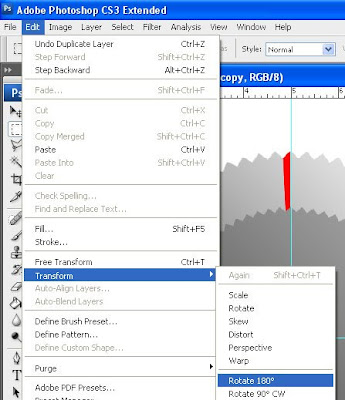
With the “Move” tool, drag the “jagged edges 1 copy” layer down until its left edge snaps to the vertical center guide and its lower part matches the lower edge of the shape of the “outer diameter” layer.
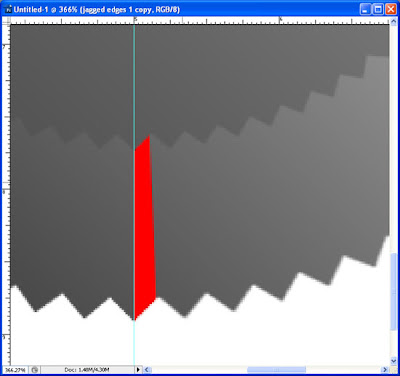
With the “jagged edges 1 copy” layer active, merge the “jagged edges 1” and “jagged edges 1 copy” layers by pressing Ctrl+E once.
Step 17
Duplicate the “jagged edges 1” layer again.
Note: We will be doing another set of that “duplicate and rotate” thing here again, very much the same as what we did in Steps 8 thru 11, only with a different shape.
Duplicate the “jagged edges 1” layer
With the “jagged edges 1 copy” layer being the active layer, go to “Edit” > “Free Transform” and rotate it by 5 degrees.
Apply the change
Duplicate the “jagged edges 1 copy” layer
With the “jagged edges 1 copy 2” layer being the active layer, go to “Edit” > “Free Transform” and rotate it by 5 degrees.
Apply the change
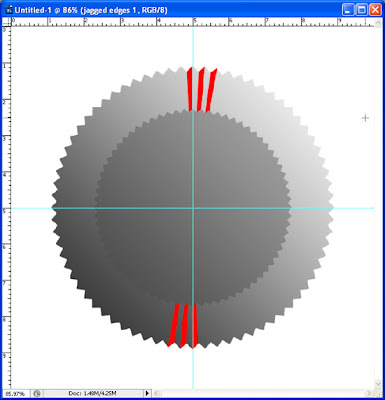
Merge the “jagged edges 1”, “jagged edges 1 copy” and “jagged edges 1 copy 2” layers by pressing “Ctrl+E” twice
At this point you should have something like this:
Step 18
Duplicate “jagged edges 1” layer again
With the “jagged edges 1 copy” layer being the active layer, go to “Edit” > “Free Transform” and rotate it by 15 degrees
Apply the change.
Duplicate “jagged edges 1 copy” layer
With the “jagged edges 1 copy 2” layer being the active layer, go to “Edit” > “Free Transform” and rotate it by 15 degrees
Apply the change
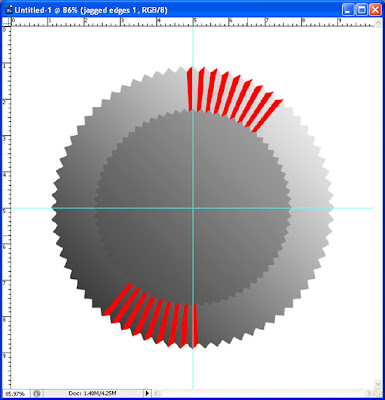
Merge the “jagged edges 1”, “jagged edges 1 copy”, and “jagged edges 1 copy 2” layers by pressing Ctrl+E twice.
At this point you should have something like this:
Step 19
Again, duplicate “jagged edges 1” layer
With the “jagged edges 1 copy” layer being the active layer, go to “Edit” > “Free Transform” and rotate it by 45 degrees
Apply the change
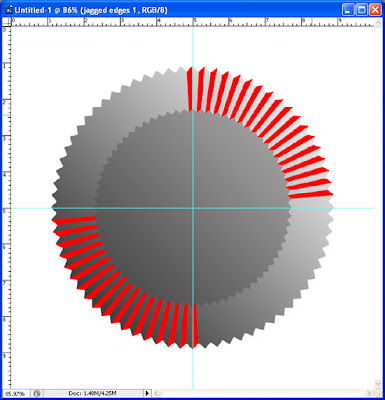
Merge the “jagged edges 1” and “jagged edges 1 copy” layers
At this point you should have something like this:
Step 20
Duplicate “jagged edges 1” layer once more
With the “jagged edges 1 copy” layer being the active layer, go to “Edit” > “Free Transform” and rotate it by 90 degrees
Apply the change.
Merge the “jagged edges 1” and “jagged edges 1 copy” layers
If you did it correctly, you should have the same result as the one shown in the screenshot below.
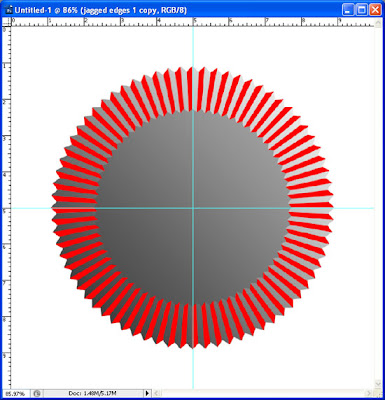
Step 21
Double click on the “jagged edges 1” layer to bring up the “Layer Styles” window.
In the layer styles window, click on the “Gradient Overlay” and do the following:
Place a color stop at 50% location with a color of #141414
Place a color stop at 0% location with a color of #bebebe
Place a color stop at 100% location with a color of #bebebe
move left color midpoint to 35%
move right color midpoint to 65%
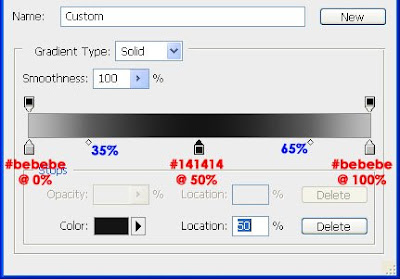
Click “OK” to close the gradient editor window.
Back in the Layer Styles window (gradient overlay options), change style to “angle” and make the angle to be at 0 degrees.
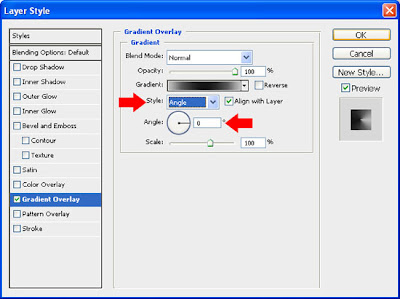
Click “OK” to close the layer styles window.
At this point you should have something like this:
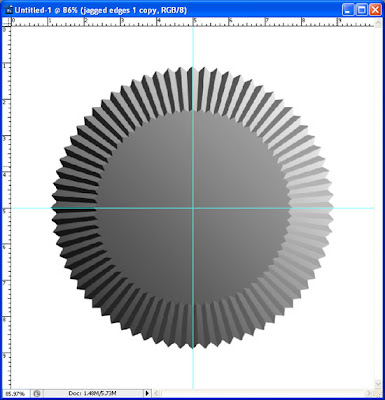
Step 22
Duplicate the “jagged edges 1” layer and rename the resulting duplicate layer to “jagged edges 2”
With the “jagged edges 2” layer active, Go to “Edit” > “Transform” > “Flip Horizontal”.
Double click on the “jagged edges 2” layer (again, to bring up the “Layer Styles” window) and click on “gradient overlay”.
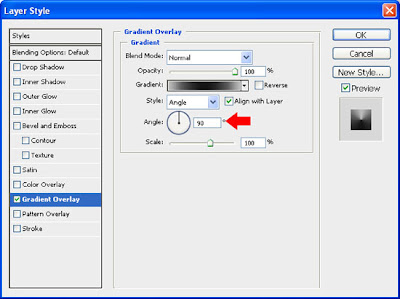
In the gradient overlay options, make the angle to be at 90 degrees. Click “OK”.
At this point you should have something like this:
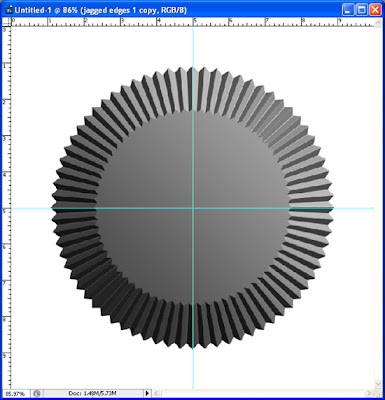
Step 23
Create a new layer on top of the “inner diameter” layer and name it “recessed”
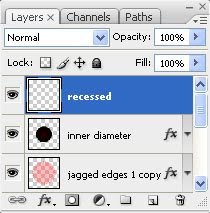
With the “recessed” layer still active, click on the “elliptical marquee” tool and change it’s style to “Fixed Size”. Enter 4.5 inches for both height and width.

Click anywhere on the canvas and move the selection until it snaps to the center. Fill this with any color (in this case I used white).
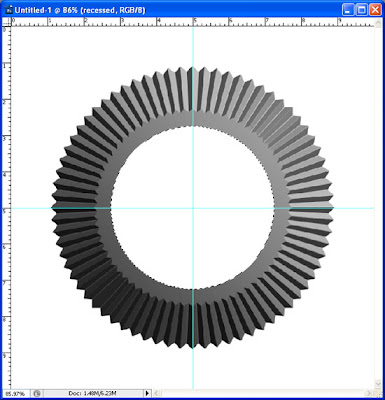
Remove the selection by pressing Ctrl+D.
Double click on the “recessed” layer to bring up the “Layer Styles” window again.
In the “layer styles” window, click on “Gradient Overlay” and click on the gradient to bring up the “Gradient Editor” window. Edit the gradient as follows:
Place a color stop at 0% location with the color white (or #FFFFFF)
Place a color stop at 23% location with a color of #191919
Place a color stop at 30% location with a color of #a1a1a1
Place a color stop at 41% location with a color of #7e7e7e
Place a color stop at 55% location with a color of #4d4d4d
Place a color stop at 70% location with the color white
Place a color stop at 86% location with a color of #8c8c8c
Place a color stop at 100% location with the color white
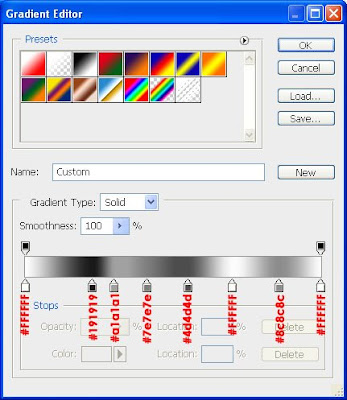
Click “OK” to close the “Gradient Editor” window.
Back in the “Layer Styles” window (gradient overlay options), change style to “angle” and make the angle to be at 36 degrees.
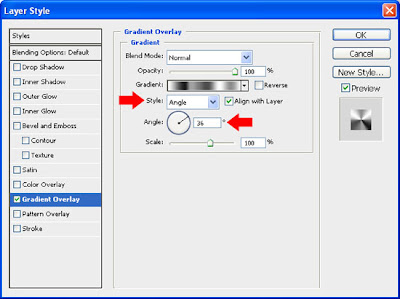
Click “OK” to close the “Layer Styles” window.
Step 24
Ctrl+click on the “recessed” layer to load selection.
Create a new layer above the “recessed” layer and name it “outer rim”
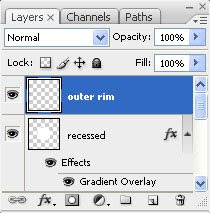
With the “outer rim” layer the active layer, fill the loaded selection with white.

With the selection still active, click on “Select” > “Transform Selection” and scale the selection down by 95% (make sure that the “Maintain aspect ratio” option is activated).
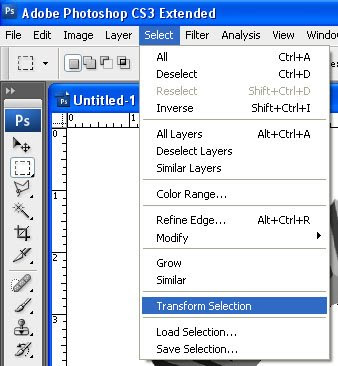

Apply the change.
With the “outer rim” layer being the active layer, press delete on your keyboard.
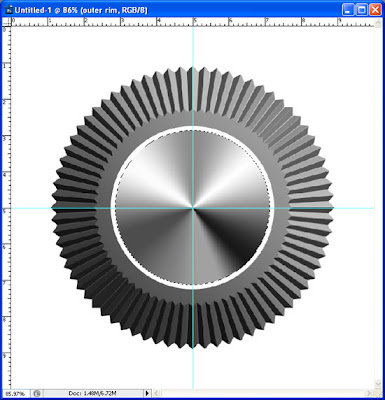
Remove the selection by pressing Ctrl+D.
Double click on the “outer rim” layer to bring up the “Layer Styles” window.
In the “Layer Styles” window, click on “Bevel and Emboss” and enter the values as shown in the screenshot below.
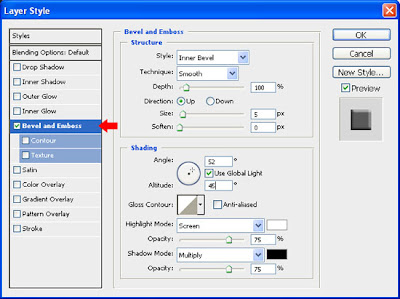
Click “OK” to close the “Layer Styles” window.
At this point you should have something like this:

Step 25
Create a new layer between the “Recessed” layer and the “outer rim” layer and name it “depth”
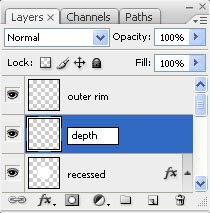
Ctrl+click on the “recessed” layer to load the selection again. With the “depth” layer active, fill the selection with any color (in this case I used white). Do not deselect.
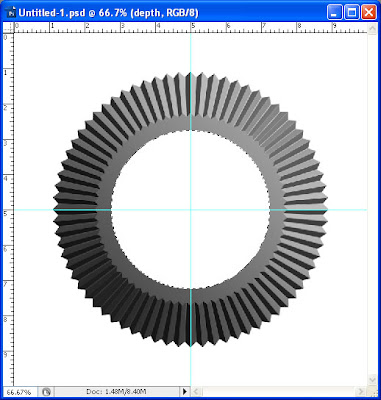
With the selection still active, transform the selection by going to “Select” > “Transform Selection” and scale the selection down to 90%. Again, make sure that the “Maintain aspect ratio” button is activated. Apply the changes.
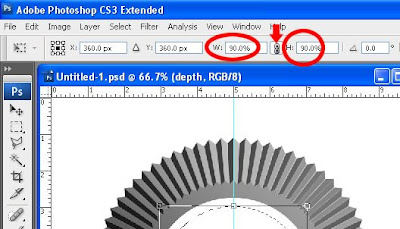
With the “depth” layer still active, press delete on your keyboard.
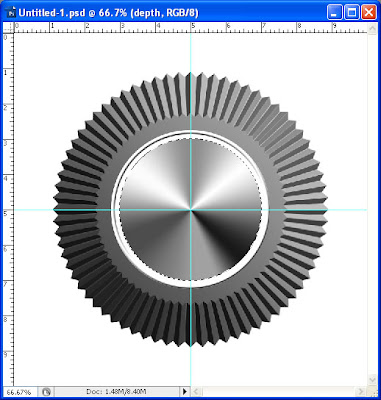
Remove the selection by pressing Ctrl+D.
Double click on the “depth” layer to bring up the “Layer Styles” window.
In the “Layer Styles” window, click on “Gradient Overlay” and click on the gradient to bring up the “Gradient Editor” window.
Place a “Color Stop” at 0% location with color white and another at 100% location with color black.
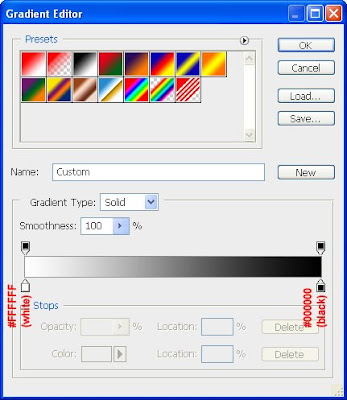
Click “OK” to close the “Gradient Editor” window.
Back in the Gradient Overlay options, set the style to “Linear” and the angle to 45 degrees.
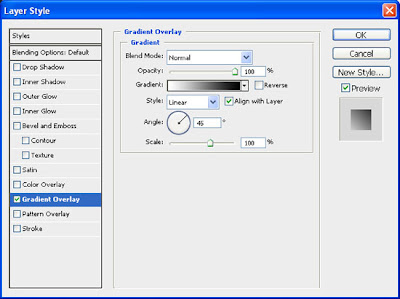
Click OK to close the Layer Styles window.
You should now have something like this:
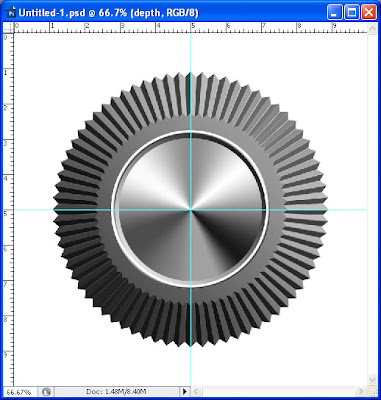
Step 26
Create a new layer between the “depth” layer and “recessed” layer and name it “shadow”
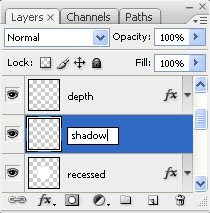
Click on the “Elliptical Marquee” tool and set the style to “Fixed Size”. Enter 4.5 in to both the width and the height.

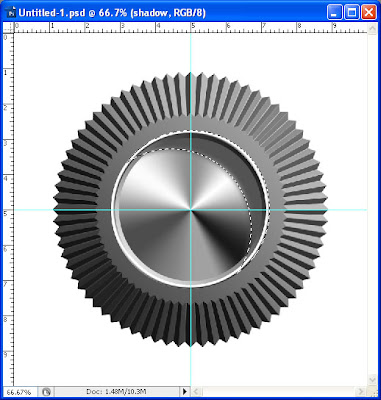
Click anywhere on the canvas to create the selection and drag the selection to a position similar to the one shown in the screenshot below.
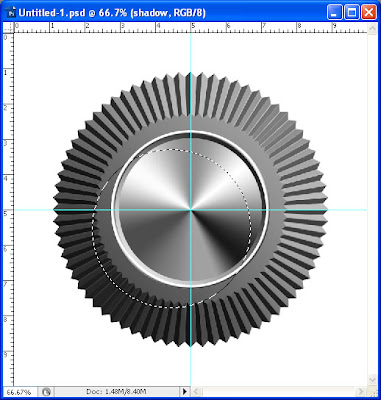
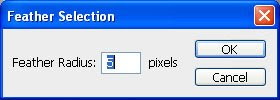
Click on “Select” and choose “Inverse” (or simply press Shift+Ctrl+I) then click on “Select” again then “Modify” > “Feather” and apply a feather of 5 px.
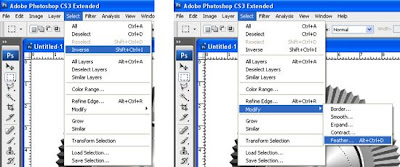
Press and hold the Ctrl+Shift+Alt keys and click on the “recessed” layer. This should give you a crescent-shaped selection like the one shown in the screenshot below:

With the “shadow” layer active, fill the selection with a color of #535353
Remove the selection by pressing Ctrl+D.
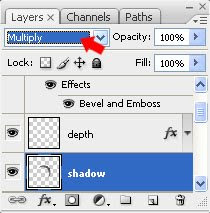
Set the blending mode of the “shadow” layer to “Multiply”.
Step 27
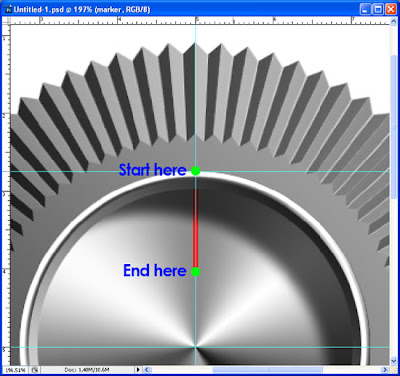
Click on the “recessed” layer to make it the active layer. Drag a horizontal guide and let the guide snap to the top edge of the “recessed” layer.
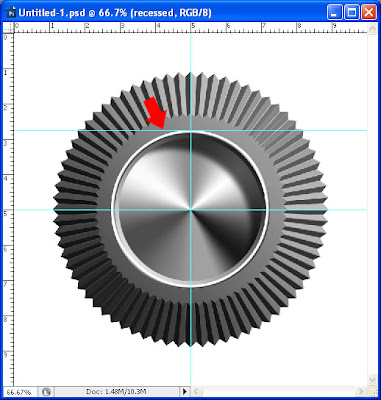
Create a new layer above the “recessed” layer (below the “shadow” layer”) and name it “marker”
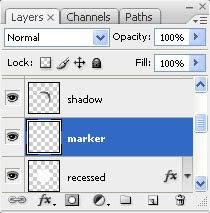
With the line tool (Fill pixels, 5 px width, red color), draw a vertical line starting from where the newly created guide and the vertical center guide intersect and ending at just about the midpoint between the newly-created guide and the horizontal center guide.

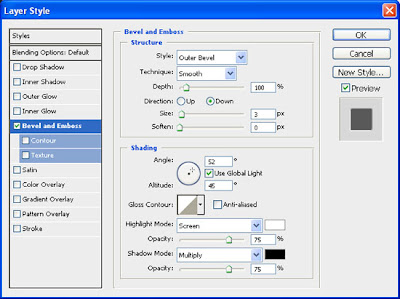
Double click on the “marker layer” to bring up the “Layer Styles” window.
In the Layer Styles window, click on “Bevel Emboss” and key in the values as shown in the screenshot below.
Click “OK” to close the Layer Styles window.
With the “marker” layer still active, click on the “Move” tool and press the “down” key on your keyboard five times (this will hide the exposed part of the bevel).
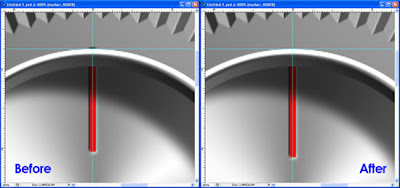
There you go!
My other Photoshop tutorials:
Six-Blade Camera Iris Diaphragm
Gun Barrel Intro from James Bond Movies


Comments:
blog comments powered by Disqus