I was right with what I said in my “Camera iris diaphragm tutorial” that it can be modified to create this kind of effect. (smile)
But before anything else, I just thought I'd share with you about this amazing video course I accidentally came across recently. The car illustrations are just amazing! Watch the video below.
It's a paid tutorial though. But if you're interested, click on this link.
Now on to our James Bond Intro Gun Barrel tutorial. Have fun!
Step 1
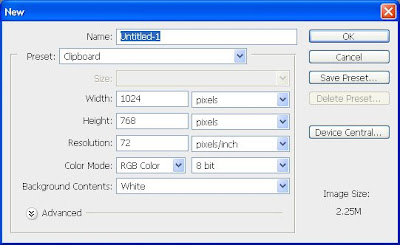
Create a new 72 dpi-document sized 1024 pixels wide by 768 pixels tall
Step 2
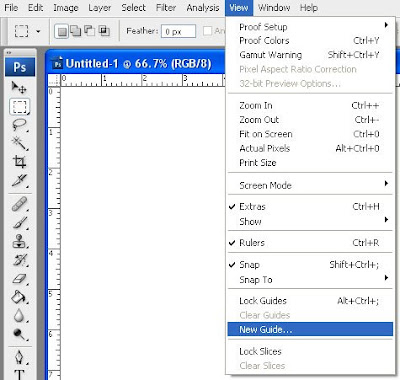
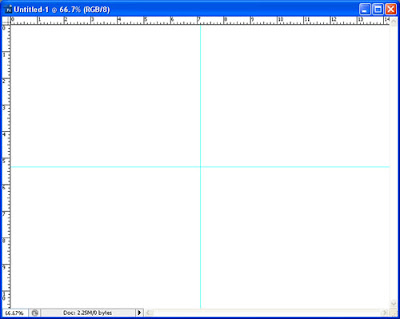
Put a vertical guide at 512 pixels and a horizontal guide at 384 pixels. To do this, go to the “View” menu and click on “New guide” (you have to do this twice, one for the vertical guide and one for the horizontal guide). This should create guides that intersect at the exact center of your canvas.

Step 3
Make sure you’ve got “Snap To Guides” turned on. If you haven’t, go to the “View” menu, then “Snap To” and click on “Guides”.
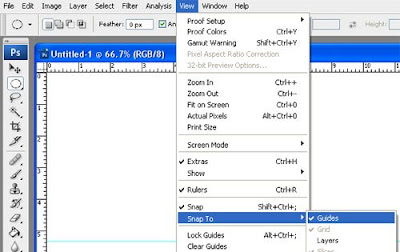
(Note: A check mark beside “Guides” indicates that you already have “Snap To Guides” turned on.)
Step 4
Create a perfectly circular selection with a diameter of 220 pixels and position it at the exact center of your canvas. The easiest way to do this is to select the “Elliptical Marquee Tool” from the tool bar, then on the tool options (on the top of the screen) set the “Style” to “Fixed Size” and enter “220 px” for both the height and the width.
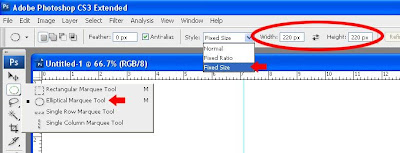
Then (with the “Elliptical Marquee Tool” still the active tool, left click on anywhere on your canvas to produce the selection.
With the “Elliptical Marquee Tool” still active, hover your mouse pointer over the selection (inside the selection) and click on (and hold) and drag the selection until its center “snaps” to the intersection of the two guides you have created earlier.
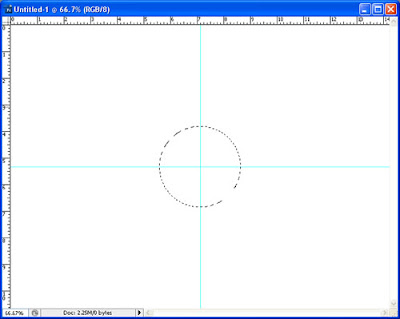
Step 5
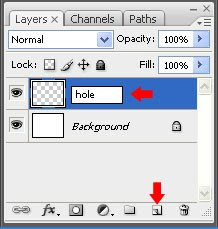
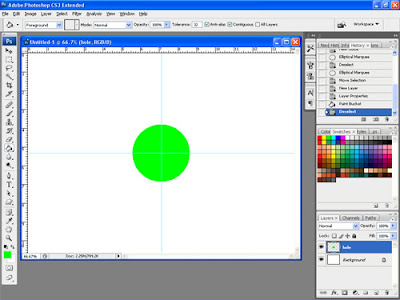
Create a new layer, name it “hole” and (with the “hole” layer the active layer) fill the selection with any color (in this case I used green). It doesn’t matter what color you use as we will be modifying this later. For now, this will serve as our guide. Deselect the selection after you have filled it by pressing “Ctrl+D”.
Step 6
With the “hole” layer still the active layer, drag a vertical guide and let it snap to the right edge of the circle you’ve just created. To do this, hover your mouse pointer over the vertical ruler at the left side of your canvas and click (and hold) on it and drag your mouse pointer to the right. If you don’t see any rulers, just press “Ctrl+R” to make them appear.
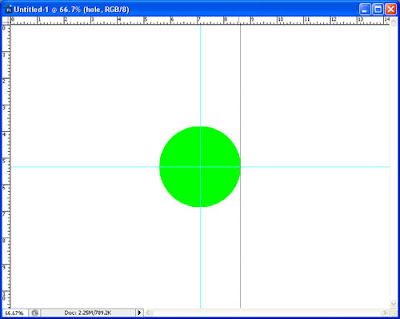
Save your work as “bond.psd”.
Step 7
We will forget about what we’ve just done so far and we will work on something on a new canvas. But, do not close your work as we will go back to that later.
Now, create a new 72 dpi-document sized 1000 pixels wide by 1000 pixels tall
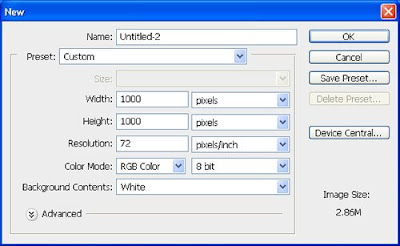
Step 8
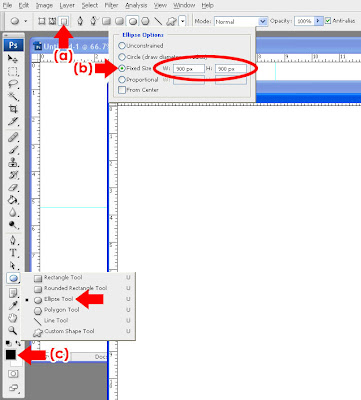
With the “Ellipse Tool” selected, set it to “Fill pixels” (a) and “Fixed Size” (b) and enter “900 px” for both the height and width.
Also, set your foreground color to “black” (c).
Step 9
Create a new layer (you need not name this anymore since we will just use it to produce something which we will eventually move to the other canvas) and click and HOLD down your left mouse button on anywhere on your (new) canvas.
While still holding your left mouse button down, drag/move the circle’s outline until you can see a complete circle on your canvas.
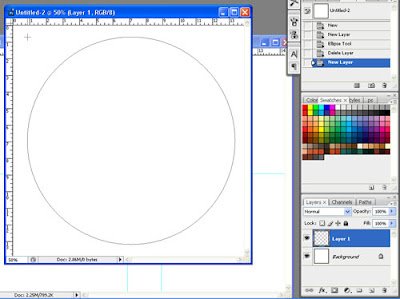
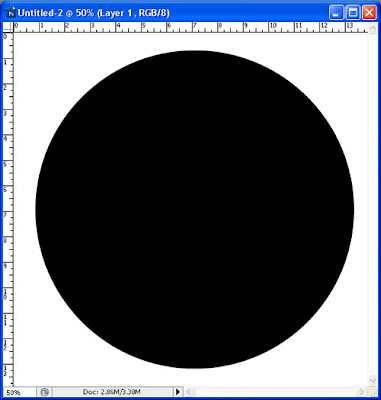
RELEASE THE MOUSE BUTTON ONLY WHEN YOU SEE A COMPLETE CIRCLE ON YOUR CANVAS. (Note: We NEED to produce a perfect circle for this. If some part of your circle falls off to any of the edges of your canvas, your circle will not be rendered completely.) You should now have something like this:
Step 10
With the layer on which you created the black circle still the active layer, Drag a horizontal guide and let it snap to the horizontal center of the black circle you’ve just created.
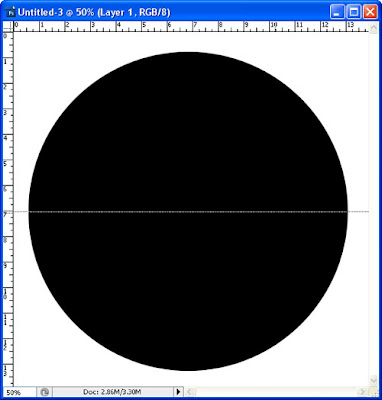
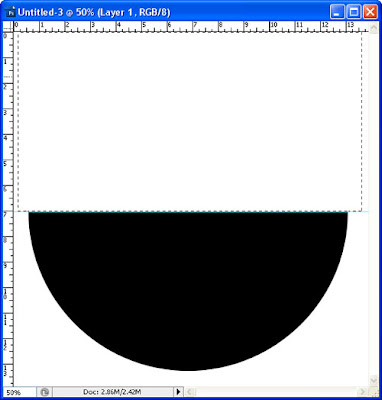
With the guide in place, use the “Rectangular Marquee Tool” to create a rectangular selection that covers the entire upper half of the black circle and press “delete”. This will leave you with only half of a circle.

Step 11
Press “Ctrl+A” to select the entire canvas and press “Ctrl+C” to copy the half-circle.
Now, go over to your other canvas (the one that you saved as “bond.psd”) and click on the “Background” layer to activate it.
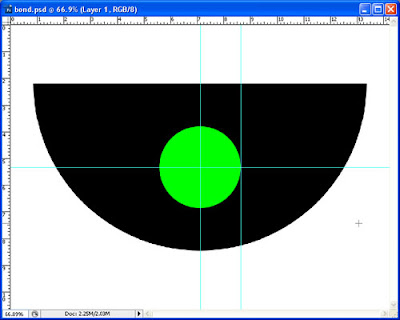
With the “background” layer activated, press “Ctrl+V” to paste in the black circle, this will paste your black circle on a new layer (named “Layer 1”). Rename that layer’s name to “wall” (to do this, simply double click on the layer’s name and type in “walls” and press enter). You should now have something like this:
Step 12
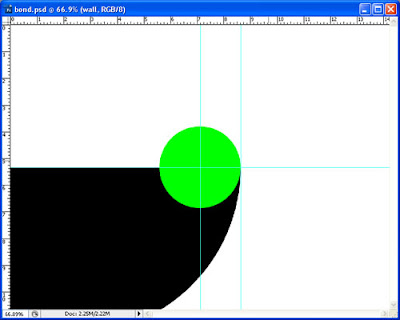
With the “wall” layer the active layer, click on the “Move tool” and drag the black half-circle (you have pasted in) until its right-most edge aligns with (snaps to) the right edge of the green circle. Also, make sure that the top edge of the half-circle snaps to the horizontal guide.
This is what you should get:
Step 13
Duplicate the “wall” layer by dragging the layer to the “Create a New Layer” button in the layers palette. This will create a new layer called “wall copy”.
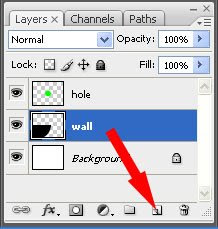
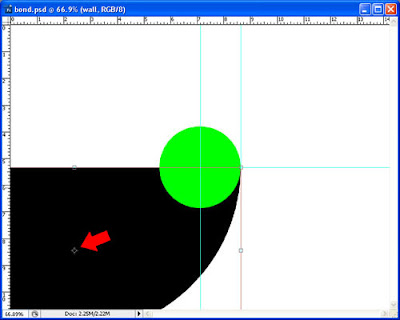
With the “wall copy” layer the active layer, press “Ctrl+T”. Move the “pivot point” to the intersection of the first two guides you’ve created at the start of the tutorial. (Note: you will need to zoom in really close to be accurate with this… just press “Ctrl and +” for zooming in. Do not use the Magnifying tool as this will get you out of the free transform mode.)
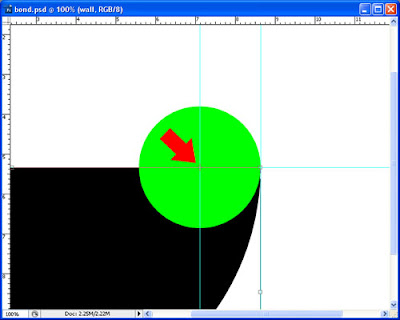
While still in “Free Transform” mode, on the “transformation options” enter “42” for the rotation. Apply the change by clicking on the “check” on the upper portion of the screen.

Step 14
“Ctrl + click” on the thumbnail of the “wall copy” layer in the layers palette (to load its selection) and click on the original “wall” layer to activate it.
With the “wall” layer now the active layer, press the delete key. By this time, you may delete the “wall copy” layer as we will not need it anymore. You should now have something like this:
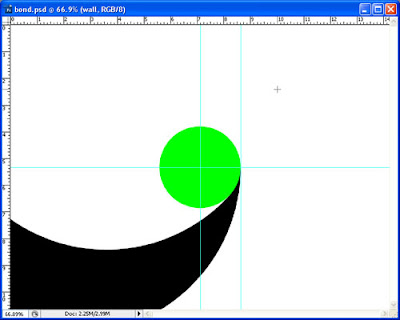
Step 15
Duplicate the “wall” layer once again and press “Ctrl+T”. With the “wall copy” layer active, as what you have done earlier, move the “pivot point” again to the intersection of the first two guides, enter “45” for the rotation this time, and apply the change.
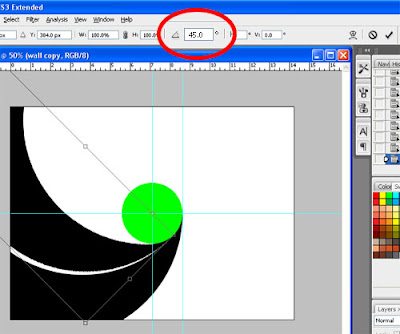
You should now have something like this:
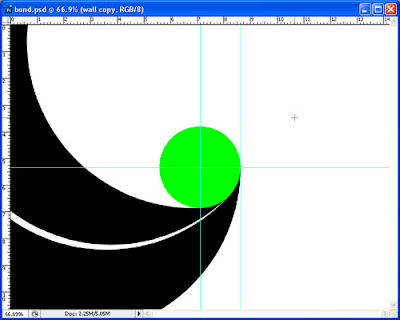
Step 16
Now, duplicate the “wall copy” layer. With the new layer (“wall copy 2”) active, go to “Edit”, then “Transform”, then select “Again” (or simply press “Shift + Ctrl + T”).
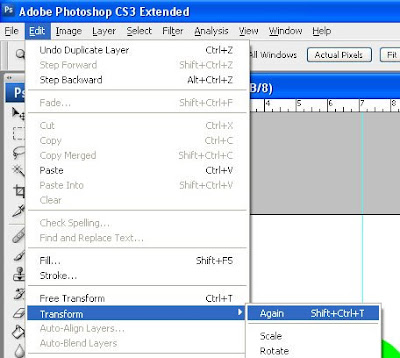
Do this 6 times over, making sure that active layer is the latest copy of the layer before applying “transform Again”.
When you’re done, you should have something like this:
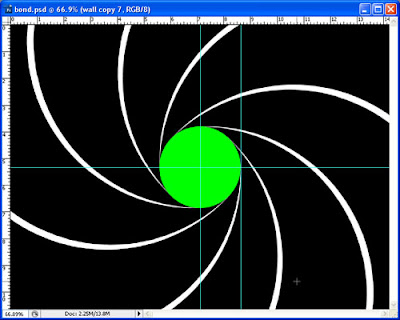
Step 17
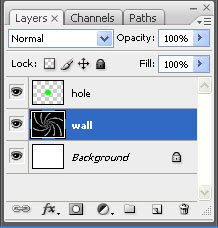
Merge all the “walls” layer into one single layer. To do this, select the topmost “wall” layer (in this case, the “wall copy 7” layer”) and press “Ctrl + E” seven times. (Either that or, if you’re using Photoshop CS, highlight all the “wall” layers by holding down the “Ctrl” key and clicking on all the “wall” layers one by one and when they have all been selected, press “Ctrl + E” once.) Whatever you do, just make sure that you merge together ONLY the wall layers.
Your layers palette should look like this:
Step 18
Now, “Ctrl + click” on the thumbnail of the merged “wall” layer in the layers palette to load its selection.
With the selection loaded, press “Shift + Ctrl + I” to invert the selection.
Step 19
Create a new layer on top of the “wall” layer and name it grooves.
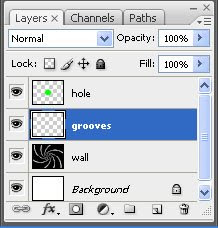
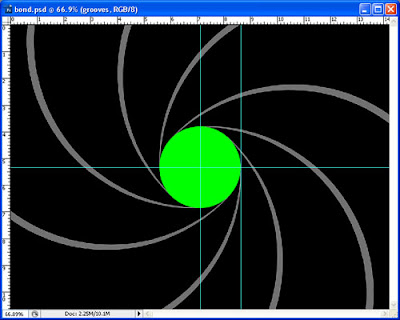
With the “grooves” layer the active layer, fill the loaded selection with grey. Any shade of grey will do as all the colors that we’ve added so far are temporary, we will modify all the colors shortly. As a matter of fact you can use any color for this at this point.
After filling the selection with color, press “Ctrl + D” to deselect. By this time you should have something like this:
Step 20
Double click on the thumbnail of the “wall” layer to invoke the “Layer Style” window.
In the “Layer Style” window, click on “Gradient Overlay” and set the gradient’s “Style” as “Radial”.
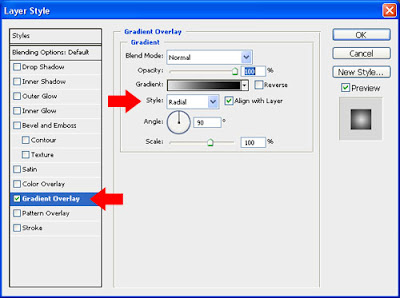
Now, click on the “gradient preview” bar (labeled “Gradient”) and apply the following colors in the “Gradient Editor” window:
#dfdfdf @ 0% location
#4e4e4e @ 35% location
# 000000 @ 100% location
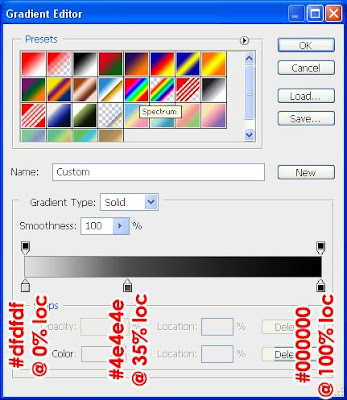
Click on “Ok” to exit the “Gradient Editor” window, and click on “ok” again in the “Layer Style” window to close it.
Step 21
Right click on the “wall” layer and click on “Copy layer style”
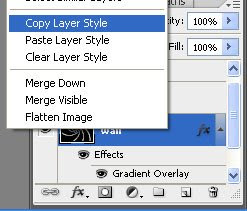
Then right click on the “grooves” layer and click on “Paste layer style”
Step 22
Double click on the thumbnail of the “wall” layer again and (in the “Layer Style” window) click on “Bevel and Emboss” and apply the settings as shown below:
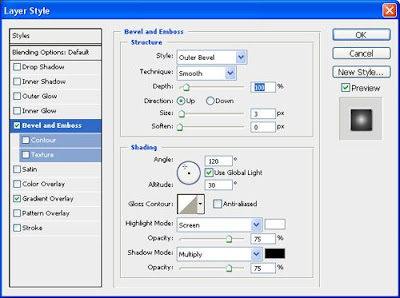
Step 23
Double click on the thumbnail of the “hole” layer and (in the “Layer Style” window) click on “Color Overlay” and choose a white color.
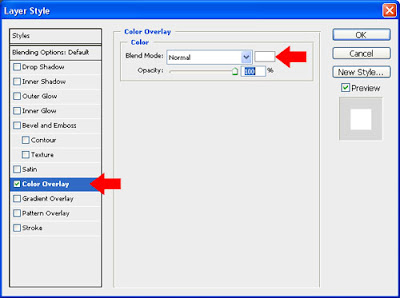
Click on Ok to close the “Layer Style” window and voila! We’re done!
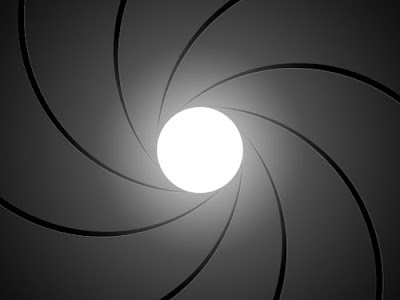
With some more playing around you can add some fancy chrome-like finish to the walls (like adding some shiny parts and really dark parts to it) and add an image to the “hole”.
Below are my other tutorials:
Six-Blade Camera Iris Diaphragm


Comments:
blog comments powered by Disqus